Virtual Classrooms in RONIN
The creation of virtual classrooms in the cloud with RONIN means students are no longer confined to the physical hardware available at their institution, and professors have a simple way of ensuring all students have access to the same environment to complete their coursework.

In the cloud, professors have the ability to design virtual classrooms where a custom teaching environment (including a base operating system, pre-installed software, datasets and other materials) can be created and replicated for student use. This means students are no longer confined to the physical hardware available at their institution, and professors have a much simpler way of ensuring all students have access to the same environment to complete their coursework.
The same features that help researchers easily set up secure research lab environments can also be used to provision secure virtual classrooms, with no cloud architects required. RONIN also provides a variety of helpful cost management features such as budget tracking, machine scheduling and our new auto pause functionality, to ensure your classroom costs are easy to monitor and control.
There are a variety of ways RONIN can be used as a teaching tool. In this blog post we will cover the two most popular approaches for setting up a virtual classroom in RONIN. The first approach can be used to give students some independence in the cloud and some real-world hands-on experience in managing their own budgets, machines and other resources in their own designated RONIN project. The second approach is much more restricted and can be implemented when students should only have the ability to connect to their designated cloud resources, not actively manage the resources themselves.
Student-managed Virtual Classroom
In a student-managed virtual classroom, the professor creates a RONIN project for each student. The professor will set a budget for the student and assign the student user level permissions so that they have the ability to create, manage and connect to their own resources within the project. By default, students will not be able to see or access any other students' project or the machines and storage therein. If group work is required, multiple students can be added as users to a single project. In this case, they will all be able to create and access resources within that project. Alternatively, we can assist you with enabling communication between two or more individual student projects. Professors can make course content and custom compute environments available to students via the RONIN Service Catalogue with assistance from one of the top-level RONIN_Admins. Below is a step-by-step guide for our recommendations on how to set up your Student-managed Virtual Classroom.
Professors must be granted RONIN_Lower_Admin permissions in order for them to be able to create and manage their student's projects in RONIN.
1. Creating the professor project
Professors should first create their own project which they can use to generate the template environments and upload any datasets that the students will use. We already have a step-by-step guide on how to create a project and what the different fields are used for; however, there is one important point that may be helpful in a classroom setting:
- The WBS Code and Purchase Order Number fields are usually used by your finance department to pivot the financial reports from AWS; however, you can input any two custom IDs that you like in these fields to enable the institution to group certain projects together. For example, to group all projects that are part of a certain course or classroom, you may want to use the course code like BIOL2001 instead of a WBS code. The department name could then be used instead of a Purchase Order Number, etc.
2. Creating a template environment
Often professors will want students to all have access to the same datasets and software. Creating a template environment ensures that all students can launch a machine with all of the required software and datasets already pre-installed. This process is made very easy with RONIN's machine packaging feature.
In the professor project, a professor can create a machine with the desired base operating system and storage size. The professor can then connect to that machine and download any required datasets and install all of the required software that the students will need. Once the template environment is finalised, the professor can then package that machine. The professor will then need to request for one of the top-level RONIN_Admins to make that package available to other projects via the Service Catalogue.
Some additional notes for creating template environments are below:
- If large datasets need to be included in the template environment, we recommend first creating an object storage bucket in the professor project and transferring the datasets there via the AWS CLI rather than directly to the machine, because this is often much faster. The datasets can then be quickly transferred onto the template machine from the bucket, and included in the template package.
- If you wish to use a particular AMI for your template environment (for example, the latest deep learning AMI from Amazon Web Services), your top-level RONIN_Admins will need to make that AMI available via the Service Catalogue. You can then select this as an option when creating your template machine and add further software or datasets before creating your package if needed.
- Some common applications and tools can be downloaded and configured on your template machine via our free desktop application RONIN LINK. For example, you can use RONIN LINK to install and manage a Virtual Desktop environment for your students. You can also install and connect to common applications like RStudio or Jupyter Notebook that can then form part of your template package. Students can then use RONIN LINK themselves to easily connect to any of these tools that are included in the template package.
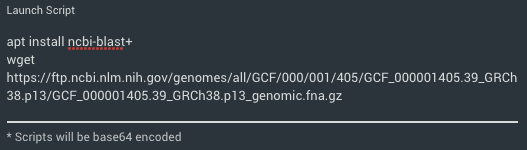
- If you have already made your package available but then realise you needed to install some additional software or download some extra datasets, often the easiest thing to do is just launch a new machine from your previous package, update the environment and then package it again. You will then need to ask your RONIN_Admins to delete the old package and make the new package available. Alternatively your RONIN_Admins may be able to update the original package by adding some commands to the Launch Script field via the Service Catalogue. For example, the launch script below will install BLAST, a popular genomics application, and download some data, on a base Ubuntu image:
3. Creating the student projects
When you are ready to start the course, you can create the student projects. We have a step-by-step guide on how to create projects, but below are some classroom specific notes:
- A project should be created for each student (or group of students if they need to work together and share resources within a project). We recommend using the student's Name as the Project Name and the student's unique identification number as the RONIN ID. For group projects, ensure the values are unique and easy to track.
- The professor should be assigned as the Project Admin for all projects.
- The student (or students if working in groups) should be assigned as Users. They will be able to access their projects as soon as they are added as users, so do this just before the semester begins.
- Course/Faculty/Department codes should be used to group projects together where appropriate as mentioned in Step 1 above.
- We recommend enabling auto pause and setting the auto pause to a value below the total budget amount. This will provide some leeway for any remaining storage costs that may be associated with the project. Machines in the project will stop automatically when that auto pause value is reached and users will no longer be able to create new resources within the project.
- Both the professor and the student should be nominated to receive budgeting alerts via email. RONIN sends notifications once 25%, 50%, 75% and 100% of the budget are reached, so it's a good way to ensure students are managing their costs effectively.
4. Monitoring and managing student projects
Once the students have access to their projects, we recommend that the students are provided with clear guidelines on how to use resources within their project that best align with the course requirements. Specifically, we suggest the following:
- Students should use the RONIN Smart Schedule feature to ensure their machine/s are only running during class time or during a specified number of hours determined by the teacher and reflected in the project budget. Students can always change the schedule to accommodate things that come up, but they should plan on turning the machines off when they are not in use.
- Students should create machine/s using template packages that have been created by the professor to access the required datasets and software.
- Professors should give students clear guidance about what kinds of instance types are sufficient for the class project. For example, a machine learning class may require a GPU for some assignments but not others, and the class budget will likely reflect this.
- Students should understand the importance of keeping access keys in a secure location and not share these with other classmates.
- Students should use the RONIN backups feature to regularly save their work e.g. weekly or after certain course milestones.
- Students should be held accountable for sticking to their designated budget. Often including budget management in the grading criteria for the course is enough incentive for students to stick to their project budget. If the auto pause feature is implemented students will no longer be able to generate resources within a project (and hence complete the remainder of their coursework) once the auto pause budget is reached.
Professors can use the Budget Management screen to see all of the student projects and ensure they are managing their budgets effectively. Results can be exported to a csv file if needed, and projects can be manually paused from this screen. Professors can also use the Machine List screen to view all of the machines across the student projects and monitor their usage.
If students are working in groups where there are multiple users per project, we are able to help you set up detailed logging of every action that is completed within RONIN to help resolve disputes related to student participation or project exploitation.
5. Cleaning up after course completion
At the end of the course it is important to ensure students take responsibility for cleaning up all resources within their project. You will not be able to close a project unless all of the resources have been removed. We have a helpful guide that shows professors how to close projects and can be used by the students to ensure all resources within a project are removed upon their completion of their course. We recommend keeping the professor project to ensure the created template packages will remain available for any future semesters/students.
Professor-managed Virtual Classroom
In this approach, a single RONIN project is created for the entire classroom. The professor will set a budget and timeframe for the class and create the required resources for each student. Students will not be given access to the RONIN user interface, they will only be provided with the keys necessary to access their provisioned resources. Below is a step-by-step guide for our recommendations on how to set up a Teacher-managed Virtual Classroom.
Professors do not necessarily require RONIN_Lower_Admin permissions for this approach unless they are governing multiple classes across several RONIN projects.
1. Creating the class project
The professor should create (or be assigned administrator access) to a RONIN project. The budget and timeline should reflect the expected expenditure of all students across the duration of the course. As mentioned in the Student-managed Virtual Classroom approach, we already have a step-by-step guide on how to create a project, but it is important to note that course/class/faculty/department codes can be used in the WBS Code or Purchase Order Number fields to track/group classes if needed.
2. Creating a template environment
The professor can create a template environment by creating a Project Package in RONIN as described in Step 2 of the previous approach. This ensures that all students will be allocated a machine with the same configuration (OS, software, datasets etc). The only difference to the Student-managed Virtual Classroom approach is that the package usually won't need to be made available to other projects via the Service Catalogue, unless classes that require the same package are spread across multiple RONIN projects.
Please refer to Step 2 of the Student-managed approach above for more information on creating template environments.
3. Creating the student machines
Once the template environment has been saved as a package, the professor can then create a machine from that package for each student in the class. We recommend using the student's unique identification number for the web address name. A separate key (or password) should be created for each student (again we recommend using the student's unique identification number for the key name).
Professors can then schedule the student's machines to ensure they are only available during class time, or a predefined set of hours a week, e.g. business hours Monday-Friday.
Once the classroom is ready, the professor needs to provide each student with their machine address, key/password, and default username. Students can then connect to their machine during the hours the machine is scheduled to be on via standard SSH or via our free desktop application RONIN LINK (recommended).
Professors may also want to give students access to other resources within the Project such as object storage where students can back up their files, submit files for assignments, or download class datasets. This would also require that professors provide students with the necessary bucket access IDs for read/write or read only access. We have some step-by-step tutorials on how students can connect to these object storage buckets via the AWS CLI or Cyberduck. If you would like student data to be automatically backed-up on a regular basis, we can work with you and your IT team to enable this functionality.
The responsibility of sharing keys securely with students should not be taken lightly. Professors should work with internal IT and Security teams to devise a protocol for key management if using this Professor-managed classroom approach.
4. Cleaning up after course completion
All resources within the class project (machines, drives, storage buckets) will need to be deleted prior to project closure. Once the project is empty, it can then be closed by your RONIN administrators. Please refer to this guide for more information.
We hope this blog post has inspired you to the possibilities of using RONIN as a tool for teaching. Which approach you choose largely depends on the goals of the course. For example, do you want students to gain experience in cloud computing (in which case the former approach is preferable), or just simply want to be able to provide students with the same resources and environment for performing their classwork (in which case the latter approach might be more suitable). Sometimes an intermediate approach may even be preferred whereby students are given user access to RONIN but all students are allocated to a single class project that the professor governs. There are many ways you can use RONIN as a teaching tool and we are always more than happy to help you assess which configuration would be most suitable for your particular use case.
Overall, the combination of RONIN and the cloud opens up a new world of opportunity for professors to give students access to the latest technologies and software in an intuitive, controlled and cost-effective manner. So what are you waiting for?