
Bigger, Smaller, More or Fewer: Changing Compute Nodes in an HPC Auto Scale Cluster
Pick compute nodes when you create an HPC Auto Scale Cluster, then change the node type and Min and Max nodes later, without building a new cluster.



You ran your first test on the cluster and the results are in. Maybe your jobs ran out of memory, or maybe they finished so fast that you are paying for far more than you need.
Good news: with the new HPC Auto Scale Clusters in RONIN, you can change your compute nodes after launch without building a new cluster. In this tutorial, we will cover how to pick compute nodes when you create a cluster, then how to change the node type and your Min and Max nodes on a cluster you already have.
This guide is for researchers and research IT staff who are comfortable submitting Slurm jobs. If you are new to the clusters, start with Meet the New HPC Auto Scale Clusters.
A quick refresher: node type, Min and Max
Three settings decide how your cluster grows:
- Compute node type is the size of each compute node. Each job gets the CPUs and memory it asks for. Without
--cpus-per-taskor--mem, a job gets 1 CPU and an even share of the node's memory for each CPU. Several jobs share a node until its CPUs or memory are used up. With hyperthreading on (the default), you can run 2 threads on each physical core i.e. 2 vCPUs per core. So, a 4 vCPU (or 2 core) node can run four 1-CPU jobs at once. With hyperthreading off, 1 CPU is equal to 1 core, so you can run half the number of jobs on the same node. Typically, sticking with the default and keeping hyperthreading enabled is fine for most workloads. - Min nodes are always running, ready for the next job. They cost money even when they are idle.
- Max nodes is a ceiling. The cluster launches nodes as jobs queue, but never more than this.
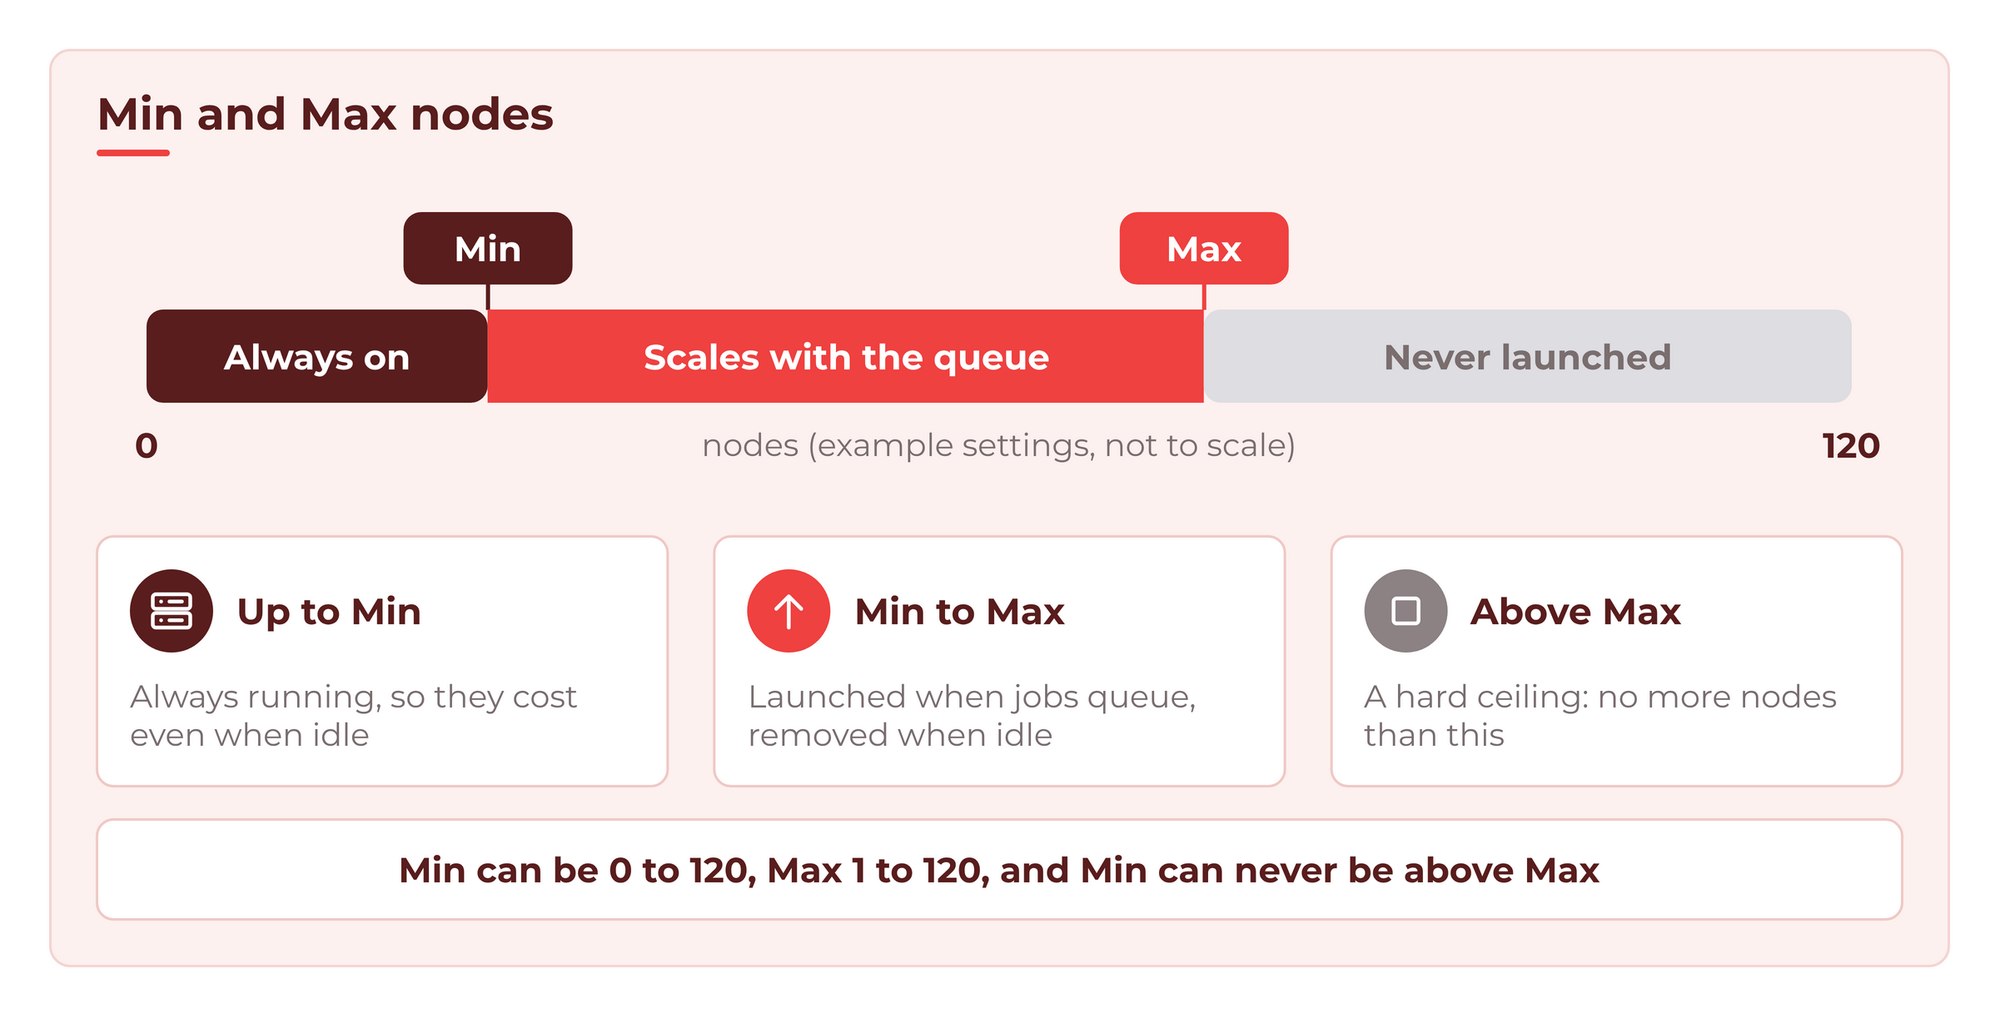
💡 Tip: Set Min nodes to 0 and your cluster scales right down to the head node when nobody is using it. This is the cheapest way to run your cluster.
Part 1: Choose compute nodes when you create a cluster
Step 1: Pick a compute node type
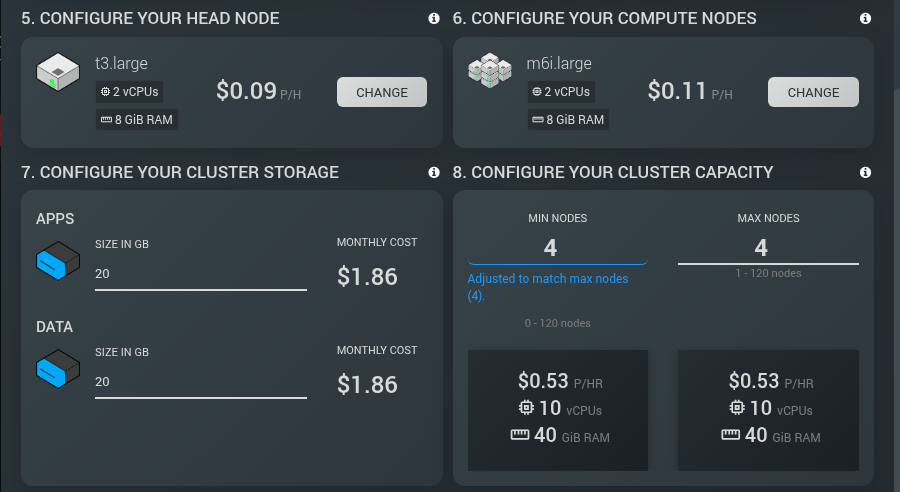
In the create wizard, scroll to the Compute nodes section. The wizard starts with t3.large selected for your compute nodes (the head node also starts as t3.large). Click to open the picker, where you can:
- quick select a common type
- search for a type by name
- filter by vCPUs, Memory, Storage and GPUs
- browse by category
When you have found the one you want, click CHANGE MACHINE TYPE. Your choice is not saved until you do.

💡 Tip: You can initially keep your head node the same size as your compute nodes if you wish to run some tests prior to submitting your jobs or have a lot of files/software to download. After that, resize it back to the default small size to save costs since it is always on, and it doesn't need much compute power to run the core pieces of the cluster. Put your budget into compute nodes, which only run when there is work to do.
Step 2: Set Min and Max nodes
In the Capacity section, set your Min and Max nodes. The wizard starts with Min nodes at 1 and Max nodes at 10. Min can be anything from 0 to 120, Max can be anything from 1 to 120.
Keep an eye on the forecast tiles as you go. They show the minimum and maximum hourly cost of your choices.
Part 2: Change compute nodes on an existing cluster
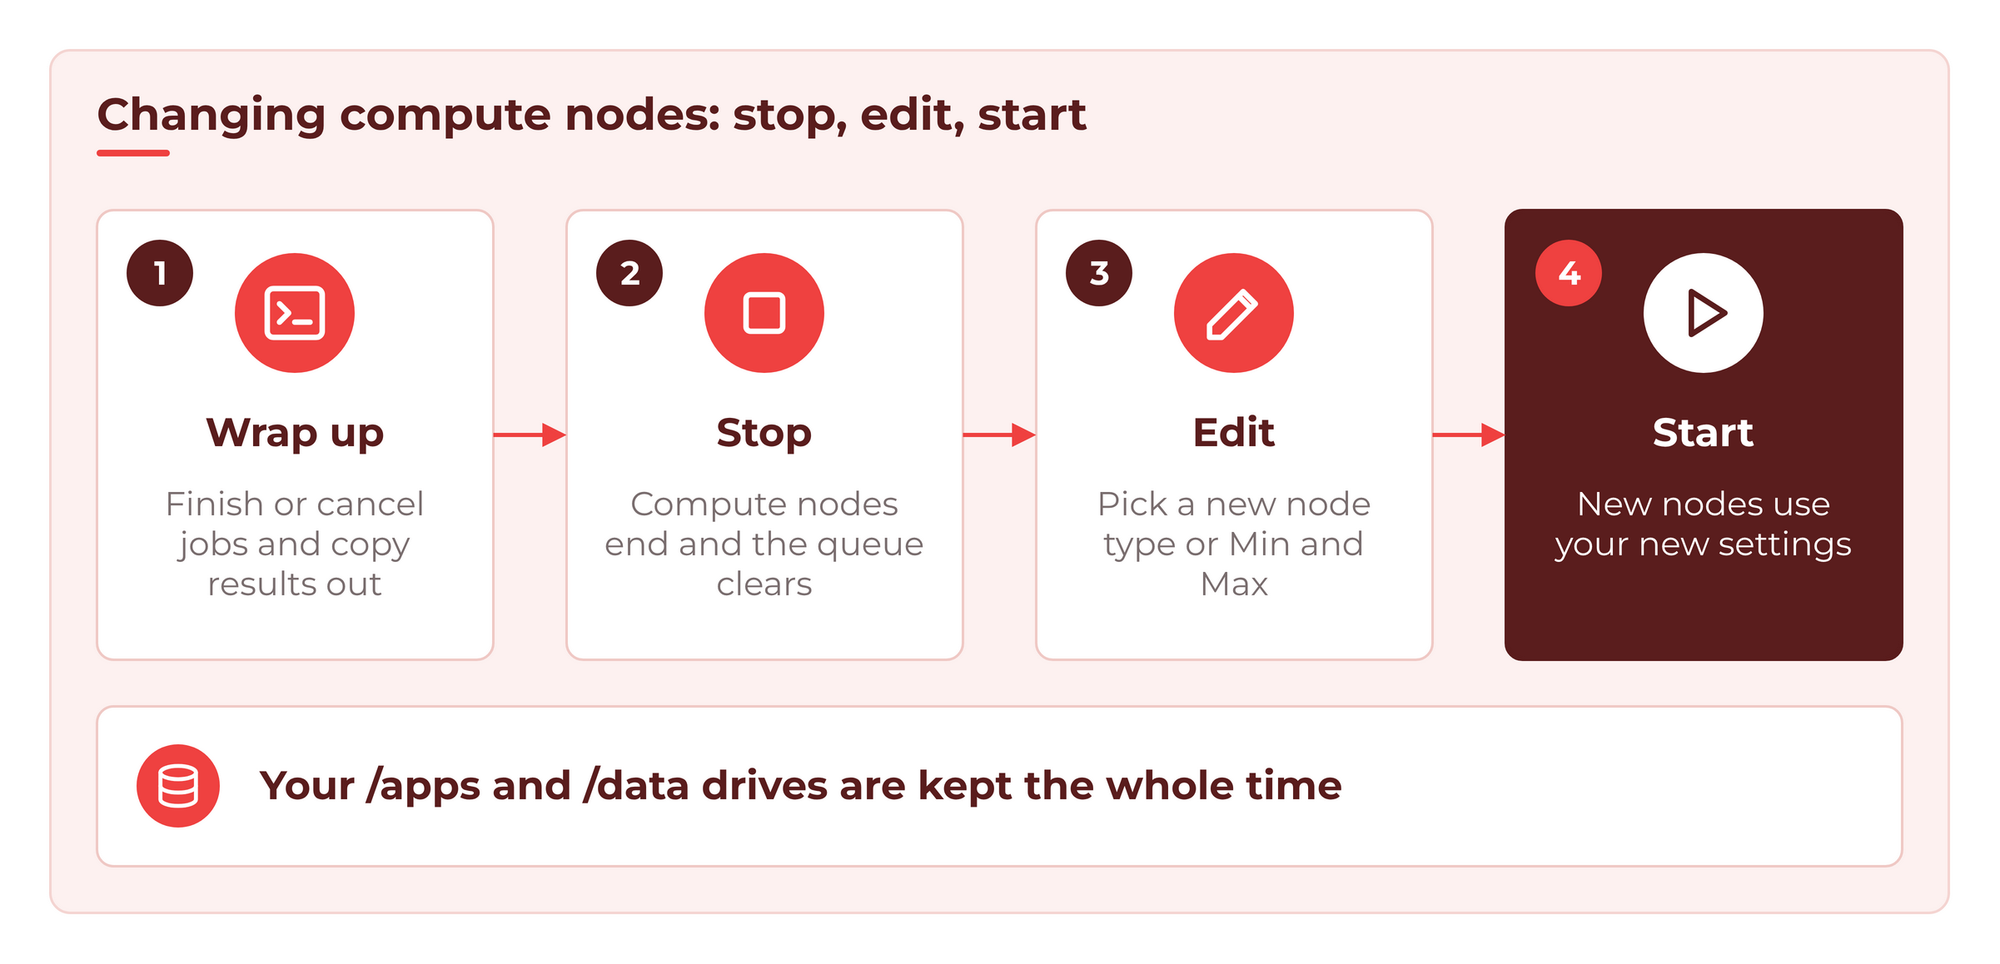
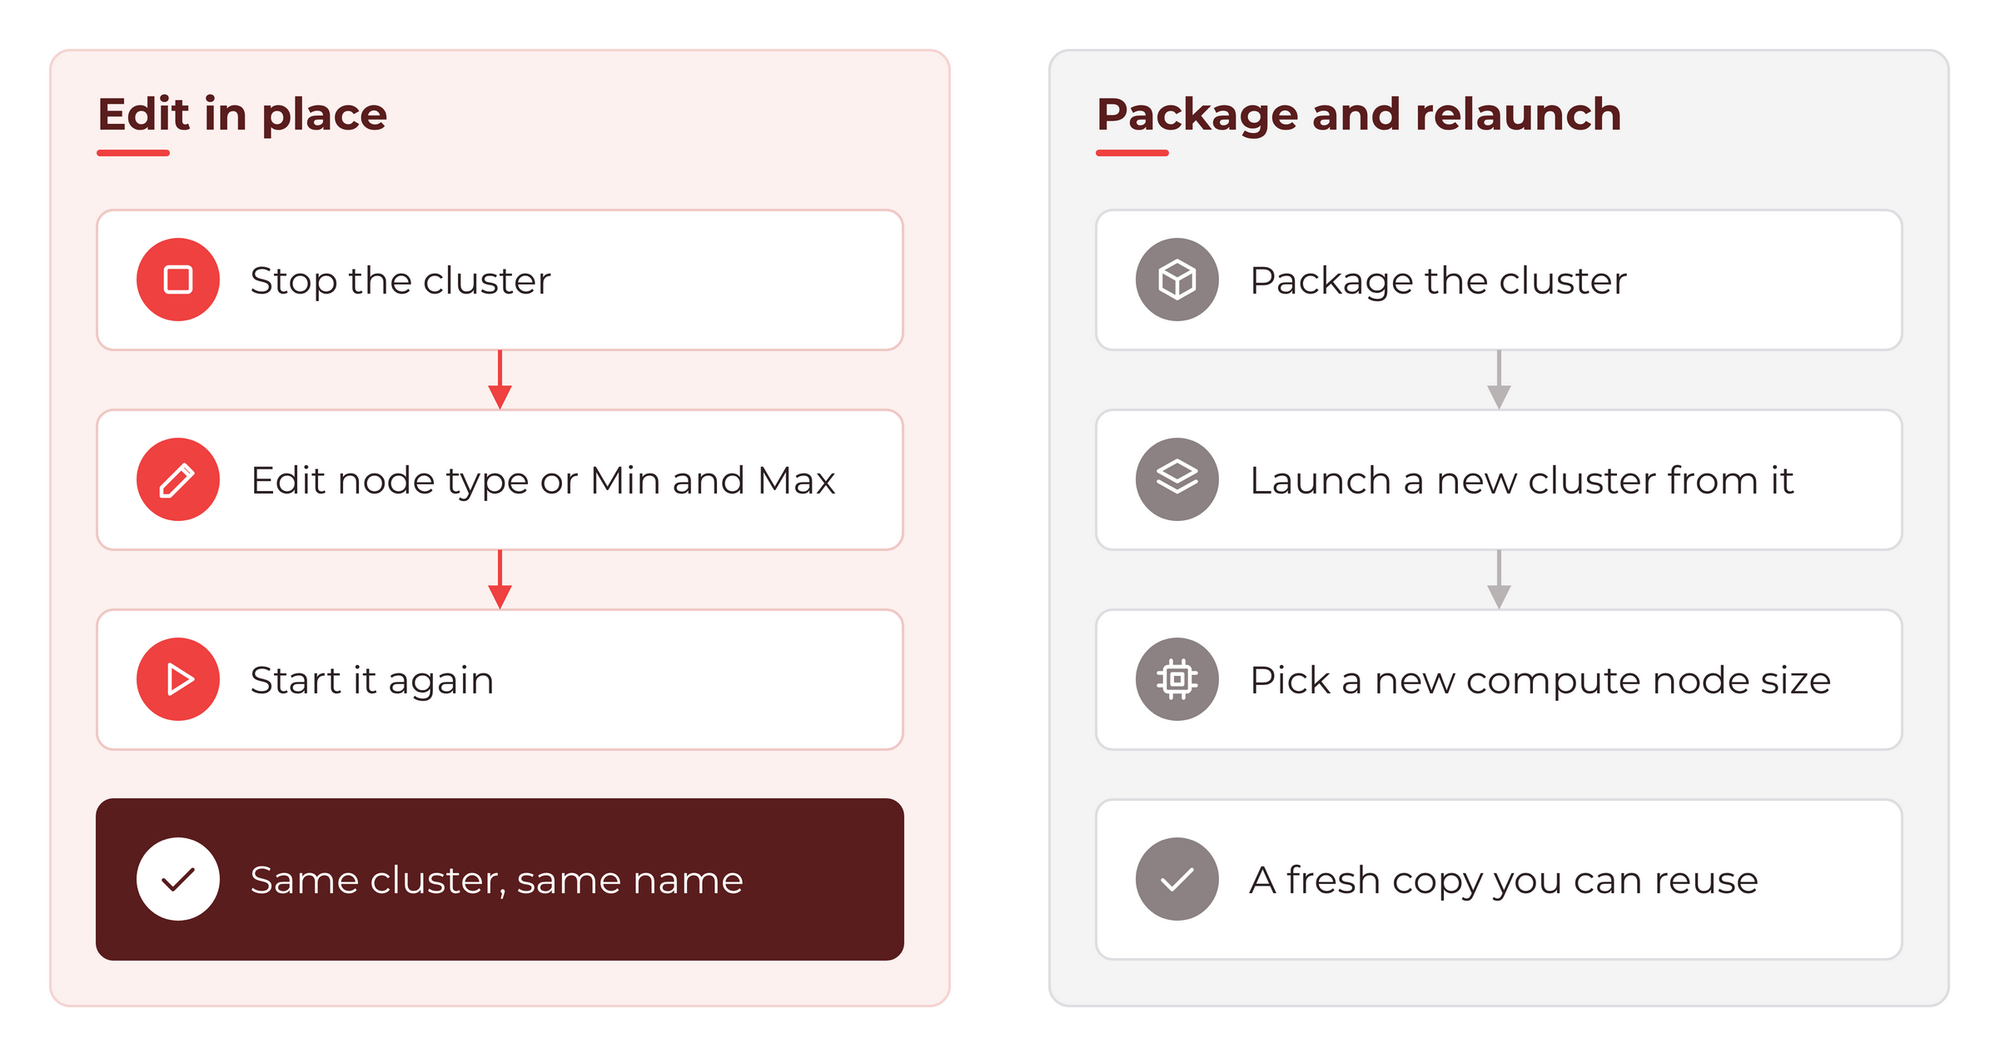
Changing compute nodes is a simple loop: stop the cluster, make your edits, then start it again.
Step 3: Check your compute nodes
Open your cluster in RONIN. On the Info tab, the compute block shows your node type, how many nodes are running (for example "0 RUNNING" when no jobs are queued), your MIN NODES and MAX NODES, and a Hyperthreading badge showing whether hyperthreading is on.
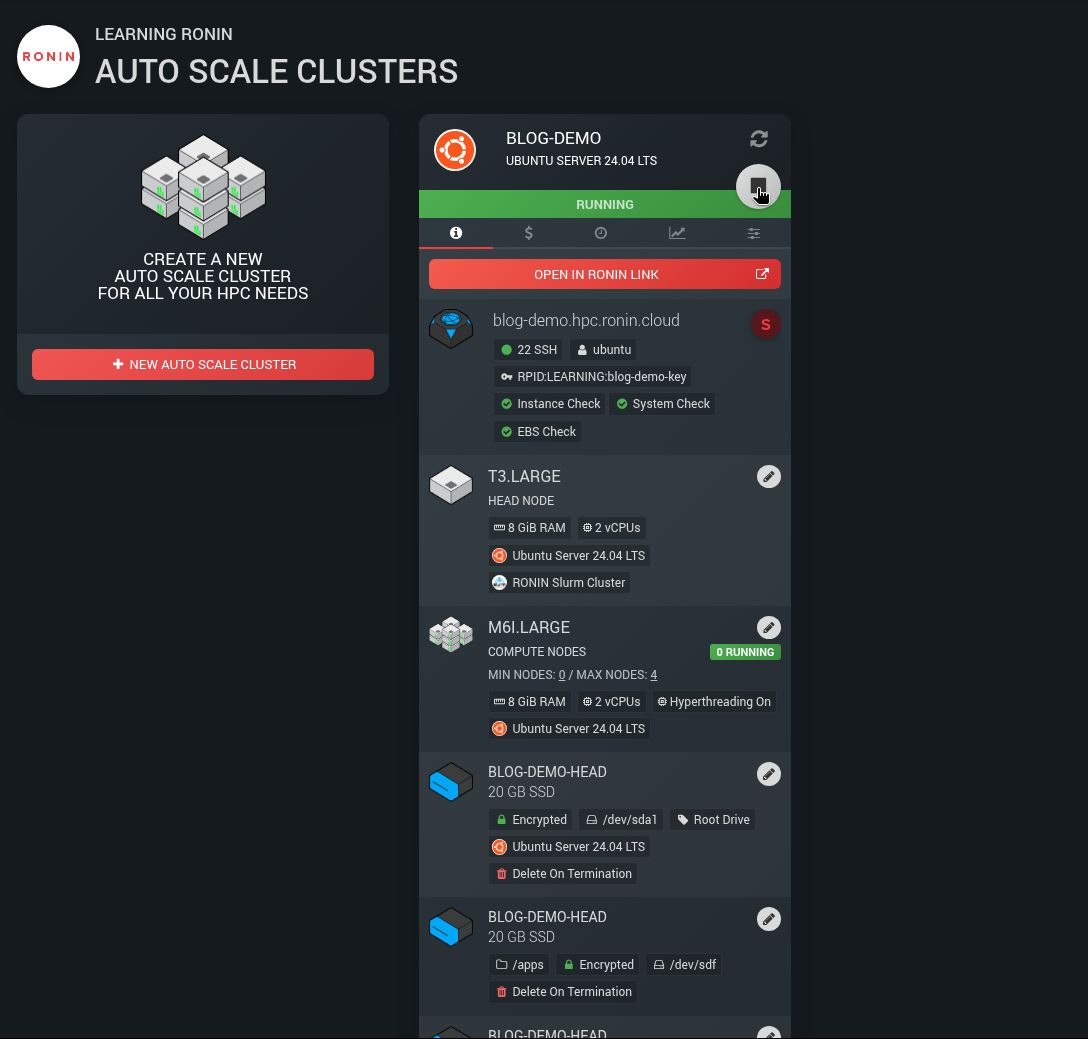
If you try to change the node type while the cluster is running, RONIN will alert you that you need to stop the cluster first.
Step 4: Finish up your jobs and save your results
⚠️ Important: Stopping a cluster ends any running jobs and clears the queue. Jobs do not pick up where they left off.
Before you stop, log in to the head node and check the queue:
squeue
Either wait for your jobs to finish, or cancel the ones you no longer need. To cancel a single job, use its job ID from squeue:
scancel 1234
To cancel all of your own jobs at once:
scancel -u $USER
Then make sure any results you need are saved to /data or your home folder, or copied off the cluster. Anything in /tmp on a compute node is lost when the node stops. Your /apps and /data drives are kept when you stop the cluster.
Step 5: Stop the cluster
At the top right of your cluster's card, click the round stop button (the square icon). There is no confirmation dialog, so the cluster starts stopping straight away.
Stopping shuts down all compute nodes and stops the head node. Your storage is kept.
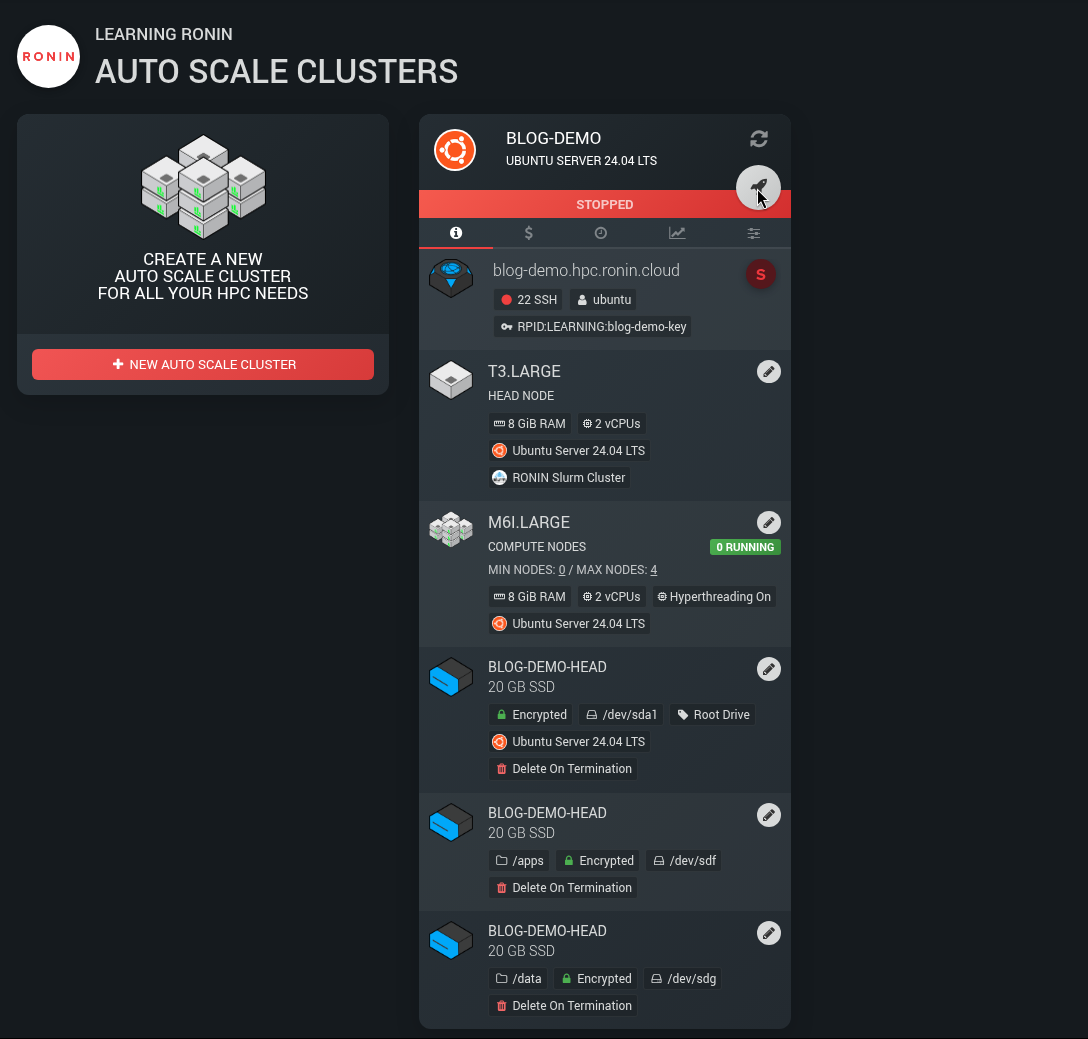
Step 6: Change the compute node type
On the Info tab, click the edit button (the pencil) on the compute block. Search for or browse to your new node type, select it, then click CHANGE MACHINE TYPE.

The compute block now shows your new node type and its vCPUs and RAM. Here we went from a M6I.LARGE with 2 vCPUs and 8GB RAM to a M6I.XLARGE with 4 vCPUs and 16GB RAM.

💡 Tip: The head node block has its own edit button, and works the same way, if you need to resize the head node too.
Step 7: Change Min and Max nodes
Click the MIN NODES or MAX NODES value to edit it. Type the new number, then click the tick to save or the cross to cancel. When it saves, you will see a confirmation alert at the bottom of your screen.
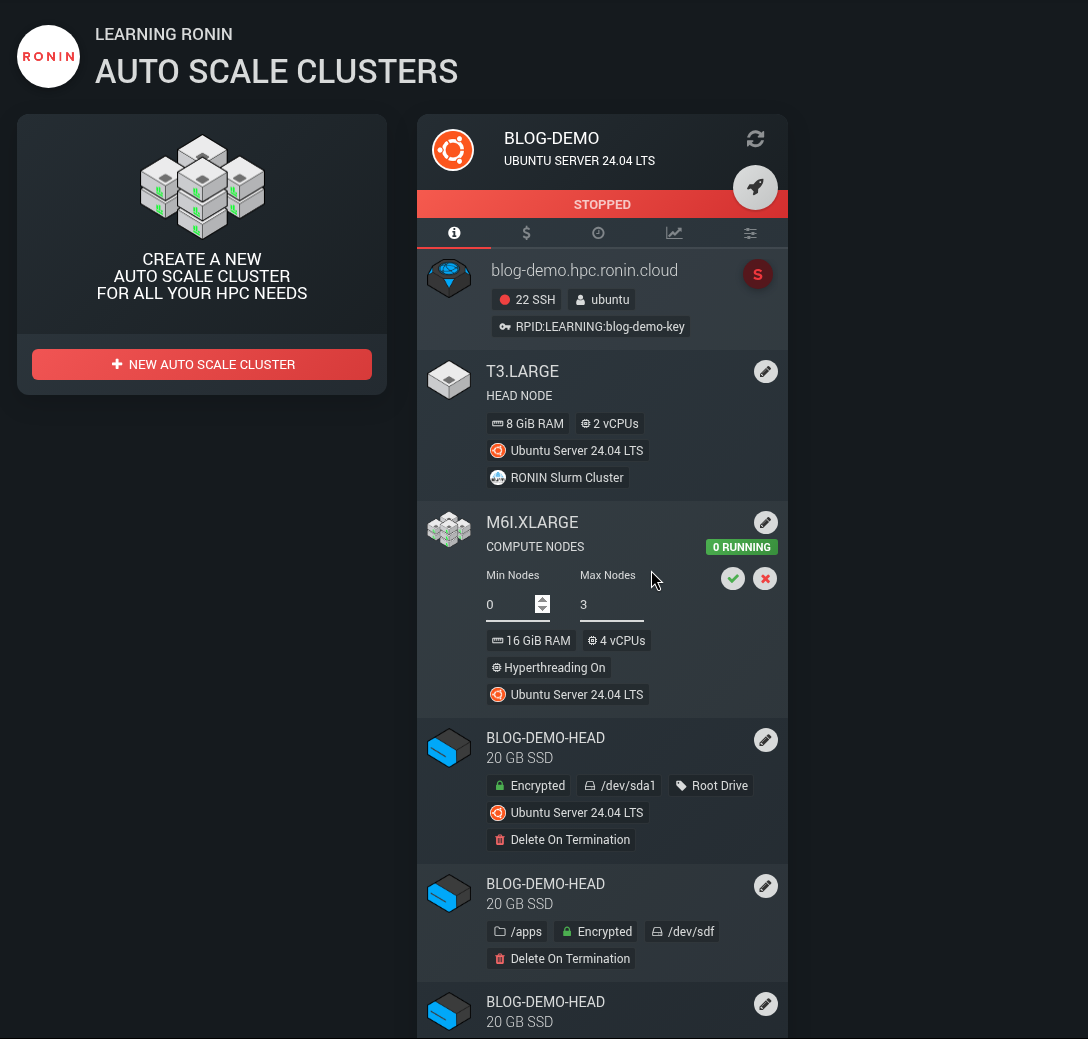
Step 8: Start the cluster
Click the start button (the rocket icon) at the top right of your cluster's card. The status changes to INITIALISING, then to RUNNING.
Your cluster keeps the same address (for example blog-demo.hpc.ronin.cloud), but its public IP address changes. Always connect using the address rather than an IP.
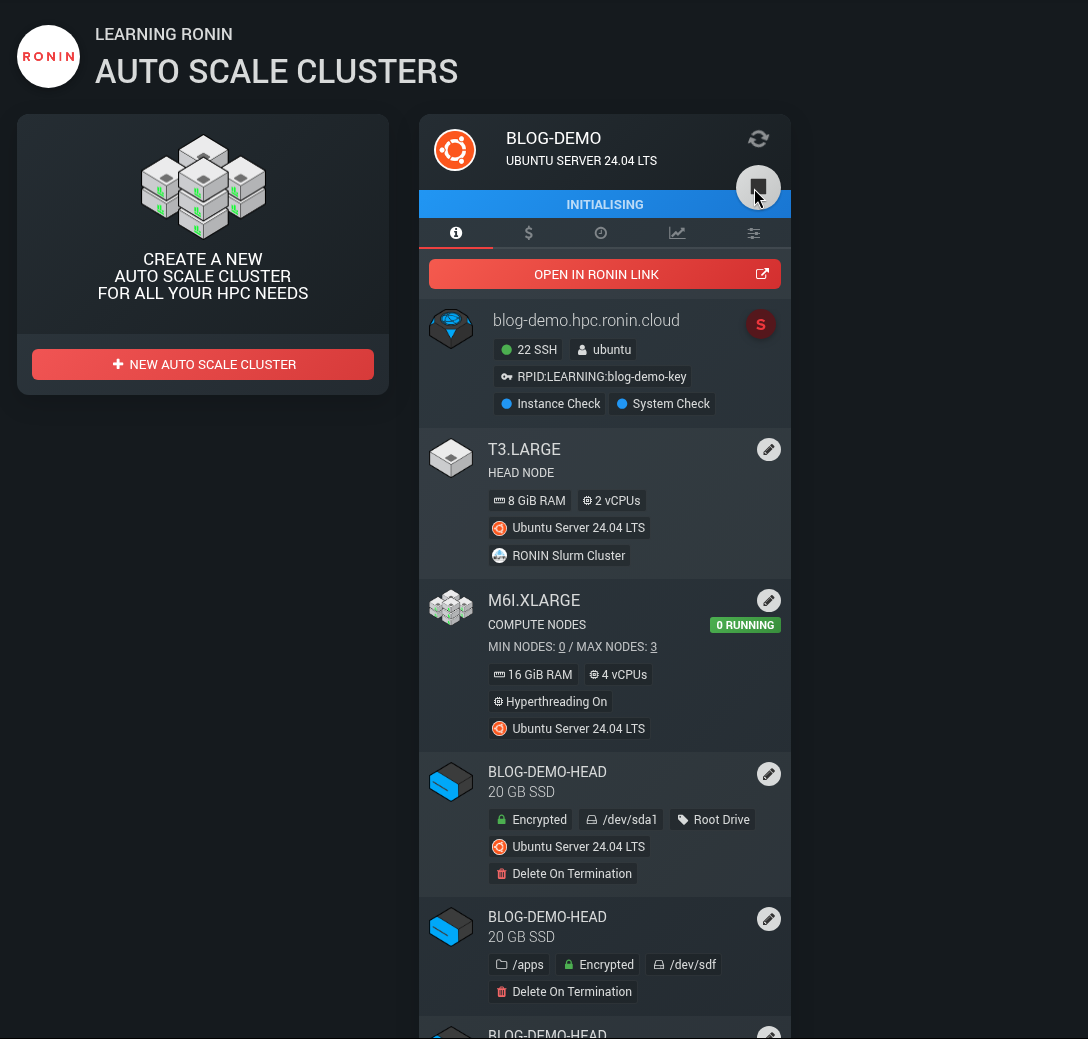

Step 9: Check your new nodes
New compute nodes launch with your new settings when jobs queue, or straight away for any Min nodes. After we changed the compute node type to m6i.xlarge and started the cluster again, new nodes launched as m6i.xlarge and Slurm reported 4 CPUs and 14,745 MB of memory on each one.
Submit a job, then check your nodes:
sinfo -N -o "%N %T %c %m"
This lists each node with its state, CPUs and memory (in MiB). Here is what we saw with three jobs running:
NODELIST STATE CPUS MEMORY
ip-10-0-1-10 allocated 4 14745
ip-10-0-1-11 allocated 4 14745
ip-10-0-1-12 allocated 4 14745
Example output. Your node names will be different.
Slurm reports about 10% less memory than the node type lists (14,745 MB on a 16 GiB m6i.xlarge), so keep memory requests a little under that figure.
Now you can ask Slurm for the resources you need. For example, this job asks for 4 CPUs and 8 GB of memory on one node:
#!/bin/bash
#SBATCH --nodes=1
#SBATCH --cpus-per-task=4
#SBATCH --mem=8G
./my_analysis
Keep your requests within what one node offers. If you ask for more CPUs or memory than your node type has, sbatch rejects the job when you submit it with "Requested node configuration is not available".
Another option: package and relaunch
Sometimes you want a fresh cluster rather than an edited one, for example to share a setup with a colleague or keep a known good copy. You can package your cluster from the Actions tab, then launch a new cluster from the package and pick a new compute node size as you do. Home folders carry over to the new cluster, and its compute nodes get the same root disk size as the head node.
Packaging restarts the head node, shuts down compute nodes and cancels running jobs, and RONIN explains this before you confirm. Allow plenty of time for packaging to finish.
Troubleshooting
The edit button or Min and Max values will not save. Make sure the cluster is fully STOPPED, not still stopping.
My job is stuck as pending. If Min nodes is 0, the first job waits while a node launches so be patient. Also check that you have not reached your Max nodes - if you have, your job will have to wait until another job is finished and a compute node has enough resources for it to be allocated. You can use the sinfo command to see what state your compute nodes are in.
New nodes will not launch. Your AWS account's service quotas can limit which or how many machines can launch. Your RONIN admin can check this on the Service Quota screen.
I need more storage, not bigger nodes. You can increase /apps or /data from the storage rows on the Info tab. Drives can grow but not shrink.
Wrapping up
You can now choose compute nodes when you create a cluster, and change the node type or Min and Max nodes on a cluster you already have, in just a few clicks.
Not sure what size you need? Run a test job and watch it in Grafana with How to Use Grafana Dashboards on Your HPC Auto Scale Cluster or take a look at the accounting stats with What Did My Job Actually Use? Slurm Accounting with sacct and seff on Your HPC Auto Scale Cluster. For everything else that is new, see Meet the New HPC Auto Scale Clusters.