A simple Slurm guide for beginners
SLURM is a popular job scheduler that is used to allocate, manage and monitor jobs on your cluster. In this blog post we teach you the basics of submitting SLURM jobs on your very own auto scaling cluster in the cloud with RONIN.


Slurm, is an open source cluster management and job scheduling system. It helps you manage your cluster and all of the workloads (jobs) that are running on it. There are a variety of different job schedulers available and you may already be familiar with one if you have previously used a shared on-premise high-performance computing (HPC) cluster. However, it's important to understand that submitting jobs to your very own cluster in the cloud can be quite different to how you would traditionally submit jobs on a shared HPC cluster. In this blog post we teach you the basics of submitting Slurm scripts on your very own auto scaling cluster in RONIN.
Before we begin, there is quite a lot of terminology to wrap your head around when it comes to clusters, so we recommend reading this blog post first, which describes some of the main terms. If you want to learn how to create a Slurm auto scale cluster in RONIN, you can also check out this blog post to get started.
What does Slurm do?
The key tasks a job scheduler like Slurm is responsible for are:
- Understanding what resources are available on the cluster (i.e. how many compute nodes are available, what size are those compute nodes and what jobs are currently running on them).
- Queuing and allocating jobs to run on compute nodes based on the resources available and the resources specified in the job script (i.e. if you submit a job that asks for 1 task with 4 vCPUs, Slurm will add the job to the queue, wait for a compute node with 4 vCPUs to become available, and then send the job to run on that compute node).
- Monitoring and reporting the status of jobs (i.e. which jobs are in the queue, which jobs are running, which jobs failed, which jobs completed successfully etc).
One of the biggest advantages of running a cluster in the cloud is the ability to easily scale up or scale down the size of your cluster as needed. This not only enables you to power through your jobs more quickly, but also provides a great cost saving benefit where you only pay for compute nodes when they are actively running jobs. In RONIN, this is achieved via AWS ParallelCluster and its integration with Slurm - ParallelCluster monitors the Slurm queues to determine when to request more compute nodes, or release compute nodes that are no longer needed. For example, when current compute nodes are busy with other jobs but there are more jobs waiting for resources in the queue, ParallelCluster will assess how many compute nodes are required to run those jobs and add additional compute nodes to the cluster (up to the maximum number specified), and will then remove compute nodes once all running jobs are complete and there are no remaining jobs in the queue. This process of scaling the size of your cluster up and down by adding and removing compute nodes as required is referred to as "Auto Scaling".
Slurm Directives
The way that Slurm determines how to allocate your jobs to the cluster (i.e. across how many compute nodes, with how many vCPUs, for how long etc) is via Slurm directives that are included at the top of your job script. These directives are indicated by lines starting with #SBATCH.
For example, the directive #SBATCH --job-name=alignment will tell Slurm that you have named this job "alignment", which can help make it easier to monitor your job and its outputs. Some #SBATCH directives also have a shorthand notation e.g. #SBATCH -J alignment is the same as the prior directive since -J and --job-name are interchangeable. In this blog post we will use the full directive names to help you remember what they mean.
If you look at the Slurm documentation you will notice that there are A LOT of directives you can use, more than 100 to be exact! But fortunately, there are only a few key directives you need to get your job running, especially in the cloud where you have the whole cluster to yourself. We will cover some of the more common Slurm directives below but if you would like to view the complete list, see here.
--cpus-per-task
Specifies the number of vCPUs required per task on the same node e.g. #SBATCH --cpus-per-task=4 will request that each task has 4 vCPUs allocated on the same node. The default is 1 vCPU per task.
--gpus-per-node
Specifies the number of GPUs per node e.g. #SBATCH --gpus-per-node=2 will request 2 GPUs per node. Only include this directive if you wish to use GPUs and ensure your compute nodes have the requested amount of GPUs available.
--job-name
Specifies a name for the job. The specified name will appear along with the job id number when querying running jobs on the system. The default is the name of the batch script.
--mem or --mem-per-cpu
These directives specify the memory in MB required per node or per vCPU respectively for the job. By default, ParallelCluster does not support Slurm memory directives and as such, including these directives in your job script will cause compute nodes to go into a "DRAINED" state and prevent successful allocation of your job. We recommend omitting these directives from your script, and by default the job will have access to all of the memory on each compute node. If you do wish to specify memory for your jobs, please refer to this blog post to learn how.
--nodes
Requests that a minimum number of nodes are allocated to the job. For example, #SBATCH --nodes=2 will tell Slurm that 2 compute nodes should be allocated for the job. If this directive is not specified, the default behavior is to allocate enough nodes to satisfy other requested resources, such as as specified number of vCPUs or tasks.
--ntasks
Advises Slurm that a certain number of tasks will be launched from the job e.g. #SBATCH --ntasks=16 will tell Slurm that 16 different tasks will be launched from the job script.
Note: ntasks is usually only required for MPI workloads and requires the use of thesruncommand to launch the separate tasks from the job script - see below for some examples and click here for more information onsrun.
--ntasks-per-node
Requests that a certain number of tasks be invoked on each node. For example, you might use this option if you want to run fewer tasks on each node than the number of vCPUs, because together the tasks would take up more memory than is available.
--time
Sets a limit on the total run time of the job. Acceptable time formats include "minutes", "minutes:seconds", "hours:minutes:seconds", "days-hours", "days-hours:minutes" and "days-hours:minutes:seconds".
Note: In the cloud, the walltime is set to UNLIMITED by default, so this directive can often be omitted. Occasionally it may be required as a precaution to terminate any scripts that have the potential to get stuck without exiting e.g. if errors result in infinite loops.
Slurm Examples
The best way to understand how to use the Slurm directives to allocate the required resources for your job is to provide some examples based on the type of workload you plan to run:
Single CPU (non-parallel) Jobs
Single CPU, or non-parallel, jobs are often simple commands that can be run on a single vCPU. You can request a single CPU job as follows:
#!/bin/bash

#SBATCH --job-name=singlecpu
#SBATCH --ntasks=1
#SBATCH --cpus-per-task=1

# Your script goes here
sleep 30
echo "hello"
This script will allocate a single vCPU on one of the available nodes, sleep for 30 seconds and then print "hello" before exiting.
If you have many single CPU commands that you want to run at the same time, rather than consecutively on the same vCPU, you can specify a greater number of tasks and then use srun to allocate each command to a task. In the below example, one task will echo "I'm task 1" and the other task will echo "I'm task 2" but both of these will be executed simultaneously on two different vCPUs.
#!/bin/bash

#SBATCH --job-name=singlecputasks
#SBATCH --ntasks=2
#SBATCH --cpus-per-task=1

# Your script goes here
srun --ntasks=1 echo "I'm task 1"
srun --ntasks=1 echo "I'm task 2"Note: In the example above, because we did not specify anything about nodes, Slurm may allocate the tasks to two different nodes depending on where there is a free vCPU available. See the MPI Jobs section below if you would like to see how to specify how tasks are allocated to nodes.
Multithreaded (Symmetric multiprocessing - SMP) Jobs
If your workload can be multithreaded, i.e. run across multiple vCPUs on the same node (symmetric multiprocessing), you should request a single node and increase the --cpus-per-task directive to be equal to the required number of threads:
#!/bin/bash

#SBATCH --job-name=multithreaded
#SBATCH --nodes=1
#SBATCH --ntasks=1
#SBATCH --cpus-per-task=8

# Your script goes here
mycommand --threads 8Note: The specified --cpus-per-task must be equal to or less than the number of vCPUs available on a single compute nodes, otherwise the allocation will fail. You can see how many vCPUs each of your compute nodes have in the information tab of your cluster in RONIN: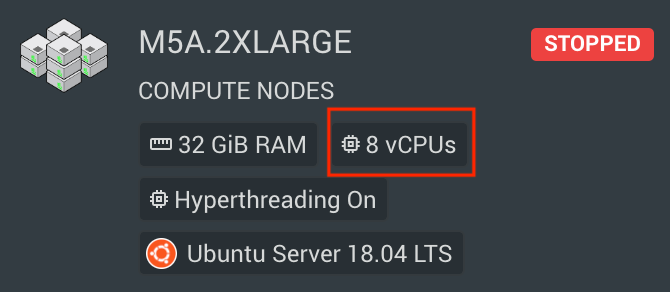
You can also specify multiple tasks if you have a number of multithreaded commands you wish to run in parallel. Just ensure you also specify enough nodes for the tasks to run across, or omit the nodes directive and let Slurm determine how many nodes are necessary. For example, the below script will launch 4 tasks in total, each on a separate node, with 4 vCPUs allocated to each task:
#!/bin/bash

#SBATCH --job-name=multithreadedtasks
#SBATCH --nodes=4
#SBATCH --ntasks=4
#SBATCH --cpus-per-task=4

# Your script goes here
srun --ntasks=1 mycommand1 --threads 4
srun --ntasks=1 mycommand2 --threads 4
srun --ntasks=1 mycommand3 --threads 4
srun --ntasks=1 mycommand4 --threads 4
Message Passing Interface (MPI) Jobs
MPI jobs can be run across multiple nodes and the --ntasks option is used to specify the number of vCPUs (since 1 vCPU per task is the default). For example, if you want your MPI job to run across 16 vCPUs and do not care how many nodes these CPUs are split across:
#!/bin/bash

#SBATCH --job-name=simplempi
#SBATCH --ntasks=16

# Your script goes here
mpirun myscript
If instead you want your 16 vCPU job to run across 2 nodes, using 8 vCPUs per node you can add the --ntasks-per-node flag:
#!/bin/bash

#SBATCH --job-name=nodempi
#SBATCH --ntasks=16
#SBATCH --ntasks-per-node=8

# Your script goes here
mpirun myscript
Slurm Commands
So once you've got your head around all the SLURM directives and you have your SLURM script ready to go, you may be wondering "What do I do with it now?". Fortunately the process of submitting your job and monitoring its progress is pretty simple. You just need to remember a few different SLURM commands.
To submit your SLURM job to the queue, use the sbatch command:
sbatch myslurmscript.shYou will then be given a message with the ID for that job:
Submitted batch job 208In this example, the job ID is 208.
To check the status of this job in the queue, use the squeue command:
squeue --job 208Note: You can runsqueuewithout the--jobflag to check the status for all jobs in the queue.
To cancel this job, use scancel:
scancel 208To check the status of your entire cluster, use sinfo. This can sometimes be helpful for troubleshooting if your jobs aren't running as expected. For more information on sinfo see here.
We hope this blog post has helped you get your Slurm on so you can start powering through your workloads like a pro on your very own auto scaling cluster! And keep your eye out for some more advanced Slurm tutorials coming soon...