
Running Claude/Pi AI Agents with Local Models on a RONIN AI Machine
Give Claude Code or Pi a locally hosted Ollama model on a GPU-powered RONIN AI Machine, with practical permission and security settings for real project work.

AI agents are a little different from a standard chatbot. Instead of simply answering a question, an agent can inspect a project, edit files and run commands to help complete a task. Handy? Very. Something you should point at an important dataset without thinking about permissions first? Probably not.
In this tutorial, we will create a GPU-powered RONIN AI Machine, run an Ollama model locally on the machine and connect it to either Claude Code or Pi. The result is an agent that can work alongside your files while model inference stays on your RONIN machine.
Which agent should you choose? This tutorial focuses on Claude Code and Pi. Claude Code provides a more guided, feature-rich experience with built-in permission prompts, making it a good default for users who want visibility and control over each action. Pi is deliberately smaller and more extensible, making it a good fit for experienced users who prefer a lightweight terminal agent they can customise around their own operating-system or container controls. Both can use the same local Ollama model, so the main difference is how the agent manages tools and workflow rather than which model does the thinking. Ollama also supports other coding agents, including Codex, OpenCode and GitHub Copilot CLI, if your team prefers a different workflow.
This workflow is useful when you want more control over where prompts and model responses are processed, including research environments that handle sensitive data. It can be used in both RONIN Core and RONIN Isolate, although tightly controlled Isolate environments may need a little extra preparation for software and model downloads.
Local or cloud: which model should you use?
A local model is not automatically the right choice for every project. In a RONIN Core environment, a cloud model may be perfectly appropriate for public, non-sensitive or otherwise approved data. Cloud models can provide access to larger or newer models without downloading model weights, sizing a GPU for inference or maintaining the model locally.
Local models become especially useful when you want tighter control over data processing, need to work without outbound model access or expect sustained usage that would otherwise attract per-token model-service charges.
| Consideration | Local Ollama model | Cloud model |
|---|---|---|
| Data processing | Prompts and responses are processed on the RONIN machine | Prompts and responses are sent to an external model service |
| Cost model | No external per-token inference charge; you still pay for the RONIN machine, GPU time and storage | Usually usage-based or subscription pricing; a local inference GPU may not be required |
| Model capability | Limited by the models and hardware you can run locally | Often provides convenient access to larger and newer models |
| Performance limits | Controlled by the machine's GPU, memory and context configuration | Controlled by the provider's rate limits, service capacity and network connection |
| Connectivity | Can keep working in an offline or tightly restricted environment once everything is installed | Requires outbound access to the model service |
| Control | Lets you pin the model version and manage the inference environment | Updates, availability and service behaviour are managed by the provider |
Tokens still matter with a local model because the context window affects memory use and performance; they simply are not being metered by an external model API. For occasional use, a cloud model may be simpler and more economical than keeping a GPU running. For frequent or long-running workloads, local inference can make costs more predictable - provided the machine is stopped when it is no longer needed.
Whichever option you choose, follow your organisation's data-classification and acceptable-use requirements. For sensitive or regulated data, confirm whether external model processing is permitted before selecting a cloud model and review the provider's current terms, data handling and retention arrangements.
The important bit: if you wish to use a local model, ensure you select an Ollama model that is installed locally on the machine. A model name ending in :cloud is not local and sends requests to an Ollama-hosted model. Local inference is also not a complete data-loss control by itself: an agent may still use network commands or web tools if the machine and its permissions allow them.Before you begin
You will need:
- Access to a RONIN project with AI Machine tools enabled
- RONIN LINK for the easiest connection experience.
- Enough AWS GPU quota and regional capacity for your chosen machine type.
- A local Ollama model that supports tool use and has enough context for agentic work.
If this is your first RONIN AI Machine, our full Creating an AI Machine in RONIN tutorial walks through every option in the composer. It is also worth reading our guide to GPU capacity, quotas and reservations before planning a larger deployment.
Step 1: Create your RONIN AI Machine
Open your RONIN project and select New AI Machine.
1. Choose a base image
Select the CUDA base image for this workflow. RONIN's AI Machine images take care of the less glamorous setup work, including the NVIDIA drivers, CUDA tooling, Jupyter and Ollama, so you can get to the interesting part much faster.
2. Add a local model
Choose one of the available local models or enter a public model name from the Ollama library. We will use gemma4:12b as the example in this tutorial.
Agentic tools benefit from a model with reliable tool calling and a large context window. A larger model may produce better results, but it also needs more GPU memory and takes longer to download. Check the model's requirements and licence before using it with your data.
3. Name and size the machine
Give the machine an address and wait for RONIN to confirm that it is available. Then select a GPU machine type with enough VRAM for both the model and its context window.
G4, G5 and G6 instance families are sensible places to start, depending on regional availability and the selected model. Remember that the model weights are only part of the memory requirement: a larger context window also uses more VRAM.
4. Configure storage and access
The default root drive may be enough for a test, but larger models, repositories and datasets can fill it surprisingly quickly. An additional data drive makes it easier to separate project data from the operating system and to retain, back up or replace that data independently.
Use encrypted storage where required by your organisation. Select your SSH key, review the estimated hourly cost and launch the machine. Keep the private key secure; anyone who has it may be able to access the machine as you.
Step 2: Wait for setup to finish
A machine can report RUNNING before every package and model has finished downloading. Check that both the Instance Check and System Check are green, then allow roughly 5-10 minutes for a smaller model. Larger models may take longer.
Click OPEN IN RONIN LINK, confirm the machine address, username and SSH key, then select LINK TO MACHINE. When the machine appears as AVAILABLE, open a terminal or start a Jupyter session.
The file /home/ubuntu/testscript.ipynb is a useful readiness check. Open and run it to confirm that CUDA can see the GPU and that the local model loads correctly. The first model load after provisioning or a restart can take several minutes, so an apparently thoughtful silence is not necessarily a problem!
You can also run these quick checks in the terminal:
ollama ls
nvidia-smi
ollama ps
ollama ls shows the models installed on the machine. After an agent has started using the model, ollama ps shows whether it is running on the GPU or has been partly offloaded to the CPU.
Step 3: Give the agent a useful context window
Coding agents need room for instructions, file contents and tool results. Ollama recommends at least a 64K-token context window for coding and agent workflows. On machines with less than 24 GiB of VRAM, Ollama may otherwise default to 4K, which can make an otherwise capable model feel rather forgetful.
Increasing context uses more VRAM, so check the result with ollama ps. If the model starts spilling heavily onto the CPU, choose a machine with more VRAM, reduce the context or use a smaller model.
On a Linux machine where Ollama runs as a system service, open its service override:
sudo systemctl edit ollama.service
Add:
[Service]
Environment="OLLAMA_CONTEXT_LENGTH=64000"
Then reload the service configuration and restart Ollama:
sudo systemctl daemon-reload
sudo systemctl restart ollama
Step 4: Start in a dedicated working directory
Both agents can read, write and run commands. Start them in the smallest directory that contains the material needed for the task, rather than in /home/ubuntu or another broad location.
mkdir -p /home/ubuntu/projects/my-agent-project
cd /home/ubuntu/projects/my-agent-project
Copy or mount only the approved files into this directory. Use version control, a snapshot or another checkpoint before asking an agent to make extensive changes. It is much nicer to have an undo button before you need one.
Step 5: Run Claude Code with a local Ollama model
For the default interactive experience, run:
ollama launch claude --model gemma4:12b
Local means local: choosegemma4:12b, notgemma4:cloudor another model labelled as cloud. The:cloudsuffix is a wonderfully obvious clue once you know to look for it.
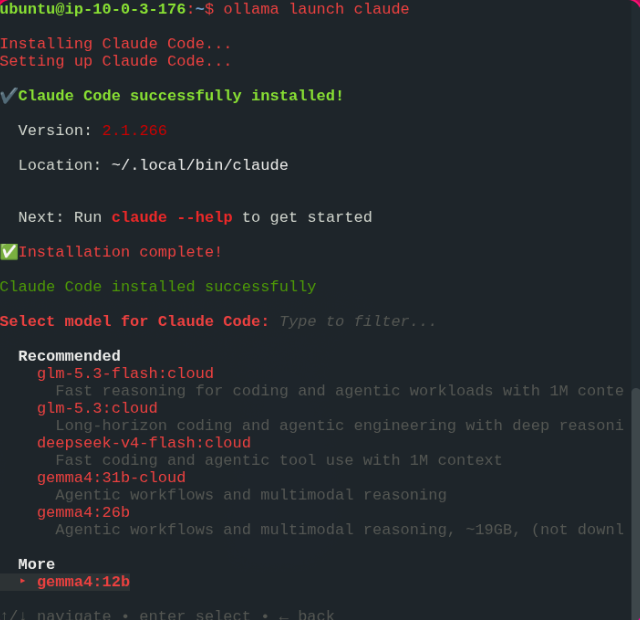
Claude Code starts in its standard manual permission mode. It can read files in the working directory, but it asks before most shell commands and file changes. That is a good first-run setting, particularly when you are learning what an agent is likely to do.
For a smoother day-to-day workflow, pass Claude Code's acceptEdits permission mode through Ollama:
ollama launch claude --model gemma4:12b -- --permission-mode acceptEdits
This mode automatically accepts edits and common file operations inside the working directory, while retaining prompts for other commands. You can type /permissions inside Claude Code to review or change its rules. When a repeated command is appropriate for the project, approve that specific command rather than allowing every possible shell command.
If approved data lives on a separate mounted drive, grant access to that exact directory:
ollama launch claude --model gemma4:12b -- \
  --permission-mode acceptEdits \
  --add-dir /mnt/sdd/approved-project-data
Avoid adding /, /home or a shared data root simply for convenience. A narrow path gives the agent what it needs without unnecessarily widening the blast radius.
What about full autonomy?
Claude Code also supports:
ollama launch claude --model gemma4:12b -- --dangerously-skip-permissions
As the flag's impressively honest name suggests, this skips nearly all permission prompts. Use it only in a dedicated, strongly isolated or disposable machine with no unrelated data, reusable credentials or access to production systems. For most interactive RONIN work, acceptEdits plus a small set of approved commands is the better balance of usefulness and control.
Step 6: Run Pi with a local Ollama model
Pi offers a smaller, highly extensible agent experience. Start it with:
ollama launch pi --model gemma4:12b
Ollama installs or configures Pi as needed and connects it to the selected model. Pi's core tools include file reading, writing, editing and shell commands.
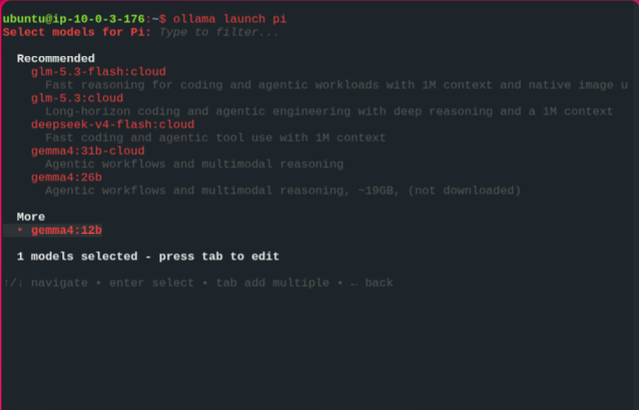
There is an important difference from Claude Code: Pi does not provide the same built-in approval-prompt system. By default, its tools run with the permissions of the Linux user who launched it. There is no extra "unlock" flag required for normal functionality.
That makes operating-system controls especially important:
- Do not launch Pi as
root. - Start it in a dedicated project directory.
- Expose only the data and credentials required for the task.
- Use a container, separate user or isolated machine when a stronger boundary is needed.
- Review third-party Pi packages and extensions before installation; extensions execute code with the user's permissions.
In other words, Claude Code begins by asking for approval, while Pi assumes the surrounding environment is the boundary. Both can be used safely, but they require different habits.
Step 7: Make Ollama local-only for sensitive workloads
Selecting a local model keeps inference on the machine, but a model picker mistake or enabled web-search feature can still introduce an external service. For an environment that must use Ollama locally only (i.e. in a RONIN Isolate environment where you are working with sensitive data), disable Ollama's cloud features at the service level.
Run:
sudo systemctl edit ollama.service
Add the local-only setting alongside the context setting if you used it earlier:
[Service]
Environment="OLLAMA_CONTEXT_LENGTH=64000"
Environment="OLLAMA_NO_CLOUD=1"
Then apply the change:
sudo systemctl daemon-reload
sudo systemctl restart ollama
OLLAMA_NO_CLOUD=1 disables Ollama cloud models and Ollama web search. It does not stop the agent from running other network-capable commands, so combine it with the machine's egress controls, agent permissions and your organisation's policies.
For regulated workloads, local inference should be treated as one part of the control set, not as a compliance guarantee. The final machine, storage, network, identity, logging, software and data-handling configuration should be reviewed and approved by your organisation's security and compliance teams.
Using the workflow in RONIN Isolate
The user experience is largely the same in RONIN Core and RONIN Isolate. The main difference is that an Isolate environment may restrict outbound access by default.
Ollama needs outbound access while it downloads a model, and ollama launch may need access while it installs or updates agent tooling. In a tightly controlled environment, confirm the required registries and package sources are allowlisted for the setup window. If outbound access is not permitted, ask the RONIN team to help package the approved model and agent tooling in advance.
Once the environment is working, save it as a RONIN package so future users can start from the same reviewed setup. This reduces repeated downloads, configuration drift and the old favourite: "It worked on the other machine."
Ready to give your local model some agency?
With a RONIN AI Machine doing the infrastructure wrangling, Ollama hosting the model and Claude Code or Pi handling the agent workflow, you can move from a blank GPU machine to a useful local assistant without spending the afternoon negotiating with driver versions.
Start with a small, non-sensitive test project. Watch what the agent reads, writes and runs, then widen its permissions only where the workflow genuinely needs them. When you are ready to standardise the setup for a team or a locked-down RONIN Isolate environment, get in touch with RONIN Support.
Further reading
- Creating an AI Machine in RONIN
- Start Building AI: A New Way to Deploy LLMs in RONIN
- RONIN LINK - Our Handy Desktop App
- Launching GPU Instances on AWS: Understanding Capacity, Quotas, and Reservations
- Claude Code with Ollama
- Pi with Ollama
- Claude Code permissions
- Ollama context length