Making a Storage Volume Available for Use in Linux
After you attach a storage volume to your machine, you will still have to let Linux know it's there. It will also have to be in a format that Linux recognises.

After you attach a storage volume to your machine, you will still have to let Linux know it's there. It will also have to be in a format that Linux recognises.
In the next steps, we will take you through how to do just that.
No need to learn the commands below. Our handy desktop app RONIN LINK can identify any unmounted drives and take care of the formatting and mounting for you!
 Aaron Albrighton
If you are on Windows, check this out instead - Making a storage volume available for use in Windows
We recommend you take a snapshot of your storage volume for backup purposes or to use as a baseline when you create another volume.
Quick Start -for the Level 20 Linux mage
Step 1 - Run lsblk to find your volume's device name
lsblkStep 2 - Create an ext4 file system on the storage volume
This step assumes that you're mounting an empty storage volume. If you're mounting a volume that already has data on it, skip to the next step. Otherwise, you'll format the volume and delete the existing data!
sudo mkfs -t ext4 /dev/device_nameReplace device_name with your volume's device name (e.g. xvdb)
Step 3 - Create a mount point directory for the volume
mkdir /vol_nameReplace vol_name with a directory of your choosing.
Step 4 - Find the Unique ID (UUID) of the formatted device for mounting
ls -al /dev/disk/by-uuid/Step 5 - Edit /etc/fstab with where you want it mounted
sudo nano /etc/fstabAdd the line to your fstab file below.
UUID=your-devices-uuid mount_point ext4 defaults,nofail 0 2Step 6 - Mount the device
sudo mount -aIf this command runs, you've successfully mounted your device! It will also mount everytime you start this machine.
Detailed Guide - while casting a Linux spell, you roll a one
Step 1 - Connect to your machine using SSH.
For more information, see Connect to Your Machine using SSH.
In this example, I have attached a snapshot with data, and also attached a blank volume.
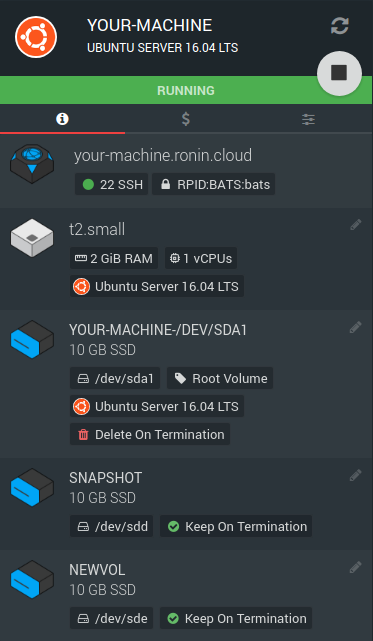
Each volume shows it's device information, be sure to take note which volume is which. In the above example, the snapshot is attached at /dev/sdd, the new blank vol is /dev/sde)
Step 2 - Open Terminal and run the following command
lsblkThe lsblk command shows your available disk devices and their mount points to help you determine the correct device name to use.
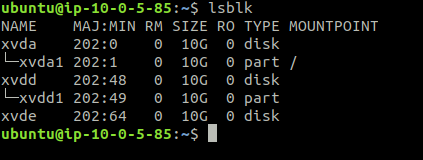
The output of lsblk removes the /dev/ prefix from full device paths. Therefore, a device might show as xvdb but the device_name for this is /dev/xvdb
Depending on the operating system, the device could be attached with a different name. For example, if your volume in RONIN shows a device name of /dev/sdb, your device could be renamed /dev/xvdb or /dev/hdb. In most cases, the trailing letter remains the same. In some operating systems, even the trailing letter can change! Be wary.
In the example above, our root volume has mounted our operating system to /dev/xvda, the snapshot as dev/xvdd and the unformatted volume as /dev/xvde
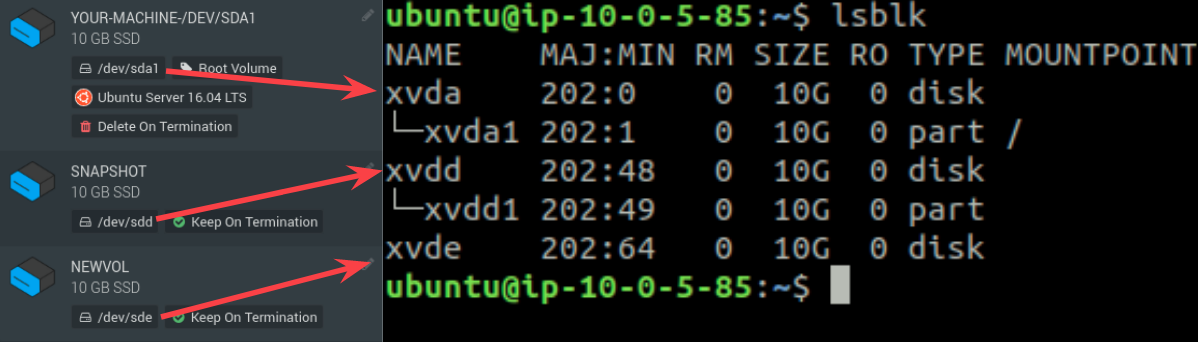
lsblk also shows partitions, and whether it is already mounted at a location. Partitions are formatted sections of a storage device. Storage can be partitioned (sectioned) many times.
As you can see, our operating system is mounted at root (/) in a partition of xvda called xvda1. The snapshot is an ubuntu backup, so it already has been formatted, and modified with a partition, but has not been mounted to a directory.. yet!
Step 3 - Create an ext4 file system on the storage volume (Conditional)
This is only required for unformatted storage! Do not run this on a drive with data as it will be deleted!
If you're not sure whether a storage volume needs to be formatted, run this command
sudo file -s /dev/device_nameReplace device_name with your devices name, found in the lsblk command above
If this outputs simply data for the device, then there is no file system on the device and you must create one.
For this example, we need to run this on our blank volume xvde
sudo mkfs -t ext4 /dev/xvde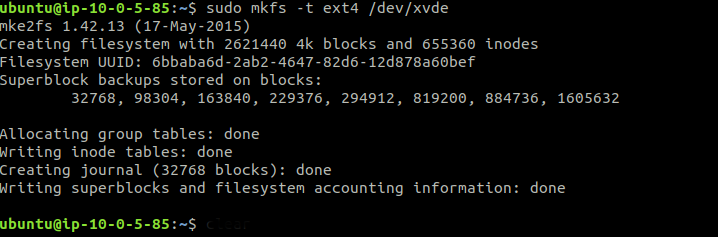
Step 4 - Create a mount point directory for the volume
mkdir /vol_nameReplace vol_name with a directory of your choosing.
For this example, I'll create a directory for the snapshot, and for the new volume, so I can mount both of them, as their respective names in the /mnt folder

Step 5 - Find your devices UUID
We need the UUID for mounting to the directory we just created. We can find it by running this command
ls -al /dev/disk/by-uuid/
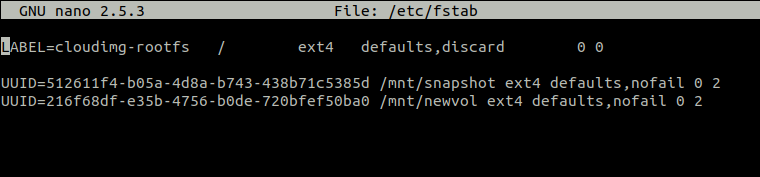
Step 6 - Open /etc/fstab file
Before you do this, it's wise to make a backup of this file, in case something goes wrong. The backup will have the .orig file extention
sudo cp /etc/fstab /etc/fstab.origNow open up the fstab file with root permissions as shown below.
sudo nano /etc/fstabAdd a line at the bottom of the file in the following structure for each device
UUID=your-uuid-here mount_point ext4 defaults,nofail 0 2In our example, we have two mount points. Our snapshot (/dev/xvdd1) with UUID 512611f4-b05a-4d8a-b743-438b71c5385d and our new volume (/dev/xvde) with UUID 216f68df-e35b-4756-b0de-720bfef50ba0
So our fstab looks like this
The last three fields on this line are the file system mount options, the dump frequency of the file system, and the order of file system checks done at boot time. If you don't know what these values should be, then use the values in the following example for them (defaults,nofail 0 2). For more information on /etc/fstab entries, see the fstab manual page (by enteringon the command line).
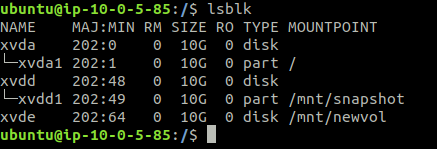
Step 7 - Mount the device
Run this command to mount the devices as declared in the fstab we edited previously
sudo mount -aIf this runs without any errors, congrats! You just mounted the volumes successfully, and it will mount correctly every time you start this machine!
If the above command errors, it means your fstab file has errors in it. Never stop a machine with errors in the fstab file! It may never start again.
(Optional) If you are unsure how to correct /etc/fstab errors, you can always restore your backup /etc/fstab file with the following command.
sudo mv /etc/fstab.orig /etc/fstab
Run lsblk again to see your newly created mountpoints
Well done! You just levelled up!
However, if you want to slay the Cloud monster, you might want to complete these quests to equip yourself for the fight!
Snapshots- the sword of time reversal
Packages- the hero's forgotten stash
Storage- buying a house in Ronindale