Documenting Your Workloads With Markdown
In this blog post we are going to focus on how to take your code documentation to the next level with a popular markup language known as Markdown.

In a previous blog post we described how important it is for researchers to develop good habits of documenting their code and recommended a number of desktop applications to assist with code management. In this blog post we are going to focus on how to take your code documentation to the next level with a popular markup language known as Markdown.
What is Markdown and why should I learn it?
Markdown is a lightweight markup language that can be used to create formatted text from plain text using specific syntax. It is commonly used by software developers to write and format code documentation quickly without requiring a formatting toolbar. You have likely come across markdown documentation before — for example, the README document that appears when you visit the GitHub page for your favorite software is written in Markdown (hence the .md extension you see at the end of most README files). In fact, this very blog post was written using Markdown!
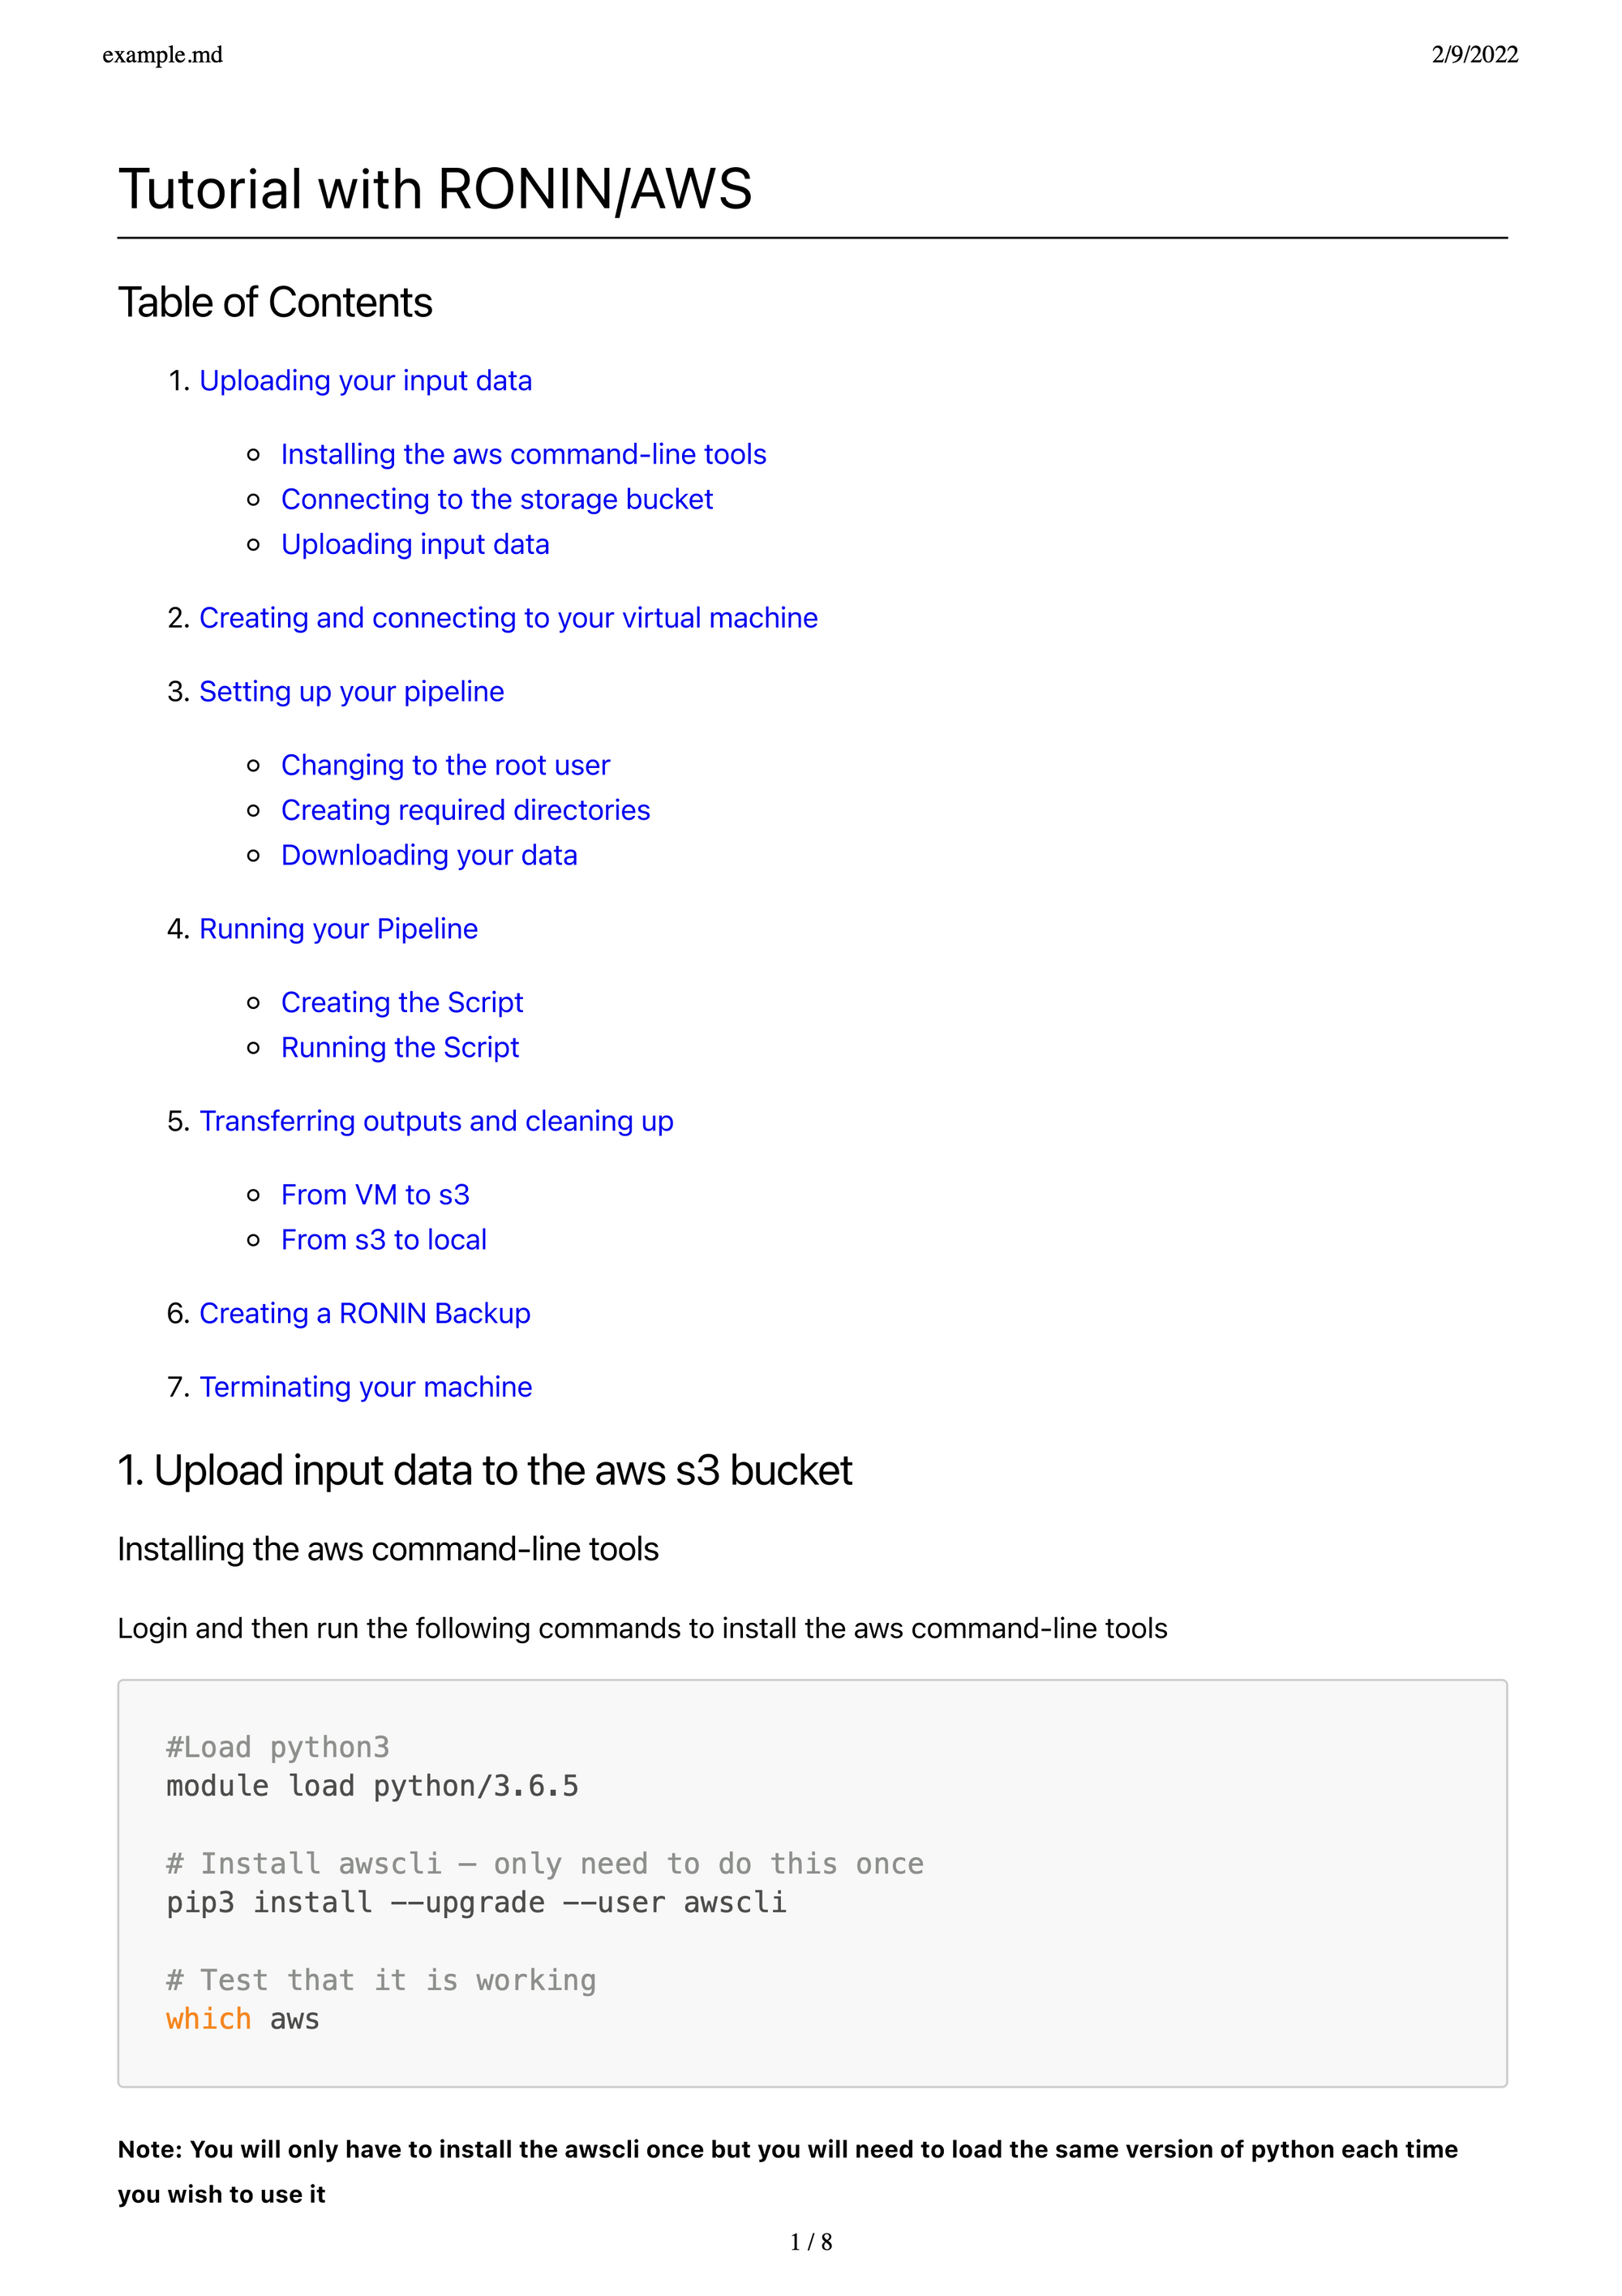
Markdown allows you to very quickly and easily create nicely-formatted documentation for your all of your code workflows. Whether you want to create a simple README, jot down some notes about your code, or generate a complete step-by-step tutorial, Markdown is the way to do it! Want to create something that looks like the document below with very minimal effort? Keep scrolling and we'll teach you how.
Okay, I'm convinced, so how do I use Markdown?
The good news is that Markdown is really easy to use once you get the hang of the syntax. To turn a simple plain text file into a nicely formatted document, all you need to remember are a few special symbols and what they do to the text.
1. Basic Text Formatting
For example, single asterisks * are used to italicize text, while double asterisks ** are used to bold text:
*italics* becomes italics
**bold** becomes bold
2. Headings
Hash symbols are used to create headings — the more hashes that are used, the further down the heading hierarchy you go. For example, a single hash # is used for the first heading level, two hashes are used for the second heading level ... and so on up to the 6th heading level like so:

3. Line Breaks
To add line breaks into your document, use <br> wherever you would like the break to go.
4. Horizontal Rules
To insert a horizontal rule, use 3 dashes on a single line with an empty line above and below it:
---
becomes
5. Links
To add a link to a webpage, the name of the link goes in square brackets [] and the URL goes in round brackets () immediately following. For example:
[RONIN](https://ronin.cloud/) becomes RONIN
You can even link to a heading within your Markdown document (which becomes very useful when creating a Table of Contents) by replacing the URL with the heading as follows:
# Heading I want to link to
[Link to the heading](#heading-I-want-to-link-to)
Note: You only use one # in the link regardless of the heading level and heading text in the link must be in lowercase and all spaces between words need to be replaced with hyphens.
6. Images
Images can also be inserted in a similar way, but preceeded by an exclamation point. For example:

becomes

7. Block Quotes
To insert a block quote, use a right angle bracket > symbol before the quote:
> This is a quote
becomes
This is a quote
8. Lists
Unordered lists can be created using a hyphen -:
- List item 1
- List item 2
- List item 3
becomes
- List item 1
- List item 2
- List item 3
Ordered lists can be created using a Number followed by a period then a space:
- List item 1
- List item 2
- List item 3
Nested lists can be created using indentation prior to the hyphen or number (one tab or 4 spaces is equivalent to one level of indentation). You can even nest an unordered list within an ordered list and vice versa:

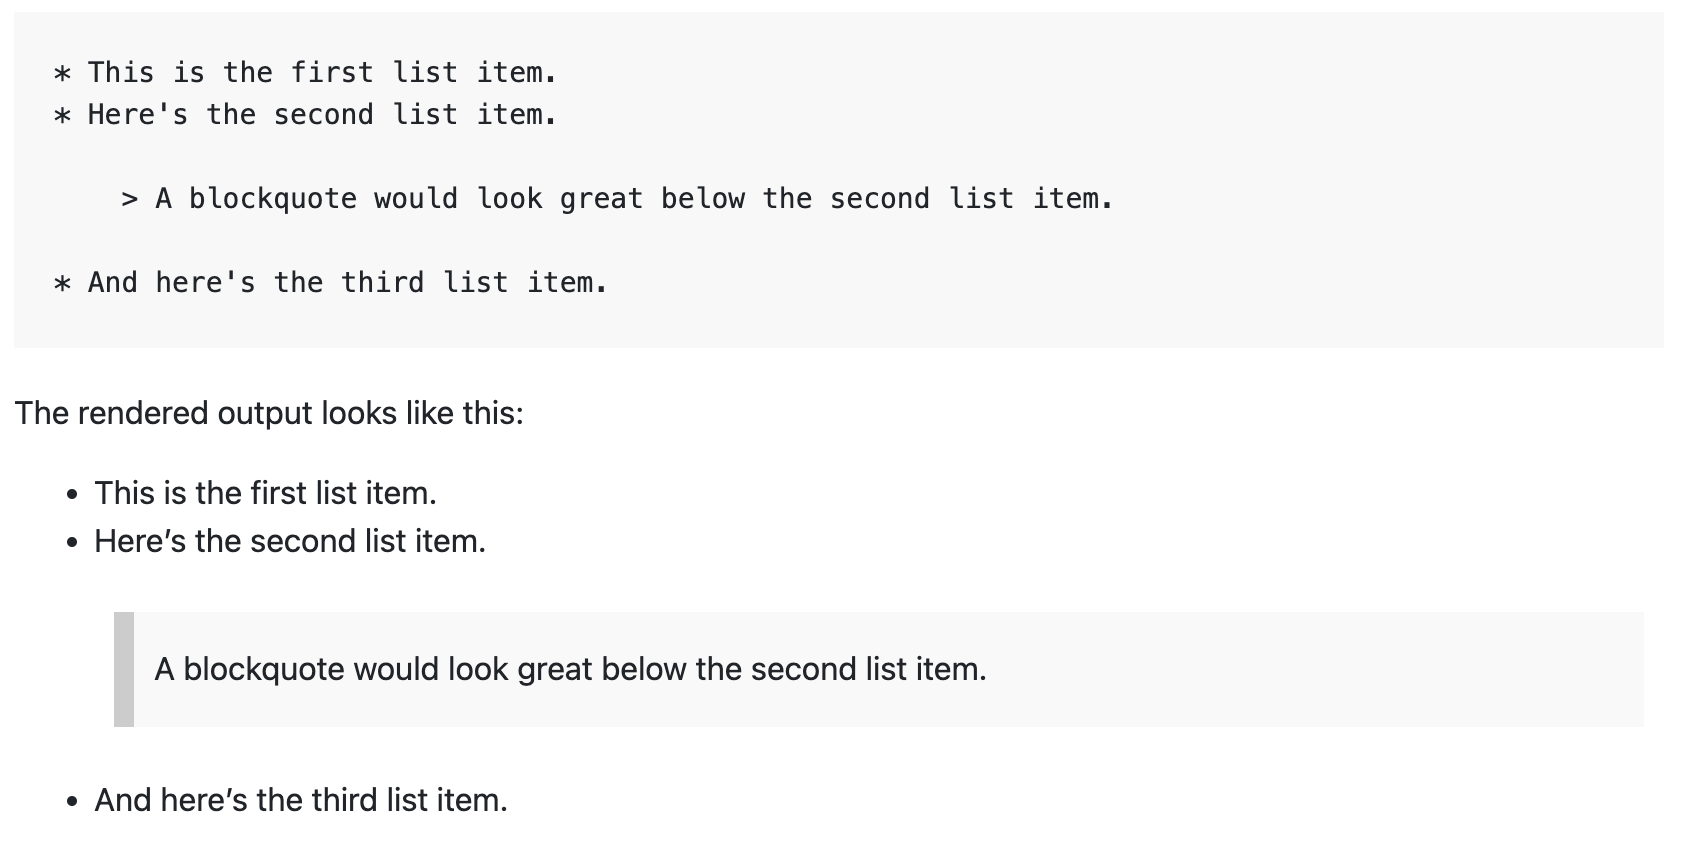
Other elements (e.g. a block of code, a quote, or an image) can also be added into a list but the element must start with an indent and have a blank line above and below it as follows:
9. Code
One of the best features of Markdown (in our humble opinion) is the ability to easily insert code into your documents.
Code can be inserted in-line using single backticks:
`here is some inline code` becomes here is some inline code
Or a block of code can be inserted using 3 backticks:
```
block of code
goes here
```
becomes
block of code
goes here10. Tables
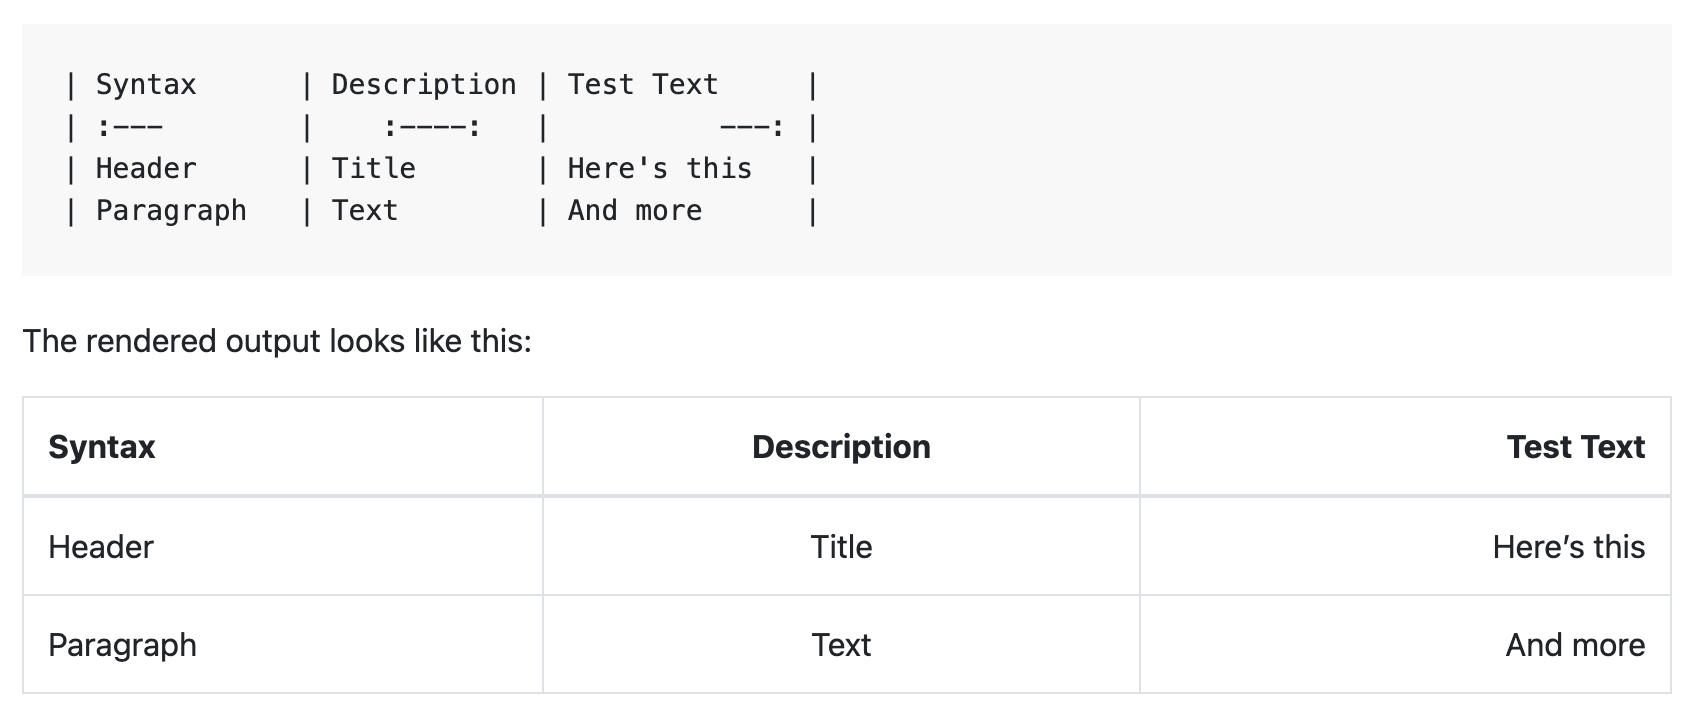
You can even create tables with Markdown! To add a table, use three or more hyphens --- to create each column’s header, and use pipes | to separate each column. You can align text in the columns to the left, right, or center by adding a colon : to the left, right, or on both side of the hyphens within the header row:
11. Escaping Characters
Sometimes you might actually want to use one of the Markdown syntax special characters as a literal character in your document instead of using it for formatting. To do so, just use a backslash \ before the character to "escape" it e.g.:
\- I am escaping this dash to prevent this line turning into a list
becomes
- I am escaping this dash to prevent this line turning into a list
Awesome, sounds easy enough, but how can I view my Markdown documents to see if I have formatted them correctly?
Even though you can create Markdown documents in a plain text editor, you won't actually be able to see Markdown's magic formatting unless you use a Markdown editor.
There are simple online editors such as https://markdownlivepreview.com/ that allow you to easily edit and preview your Markdown code all in the one place (which you then have to copy and paste into a text editor to save your Markdown code as a file), or there are plenty of Markdown desktop applications that you can download for your operating system - for a comprehensive list see https://au.oberlo.com/blog/markdown-editors.
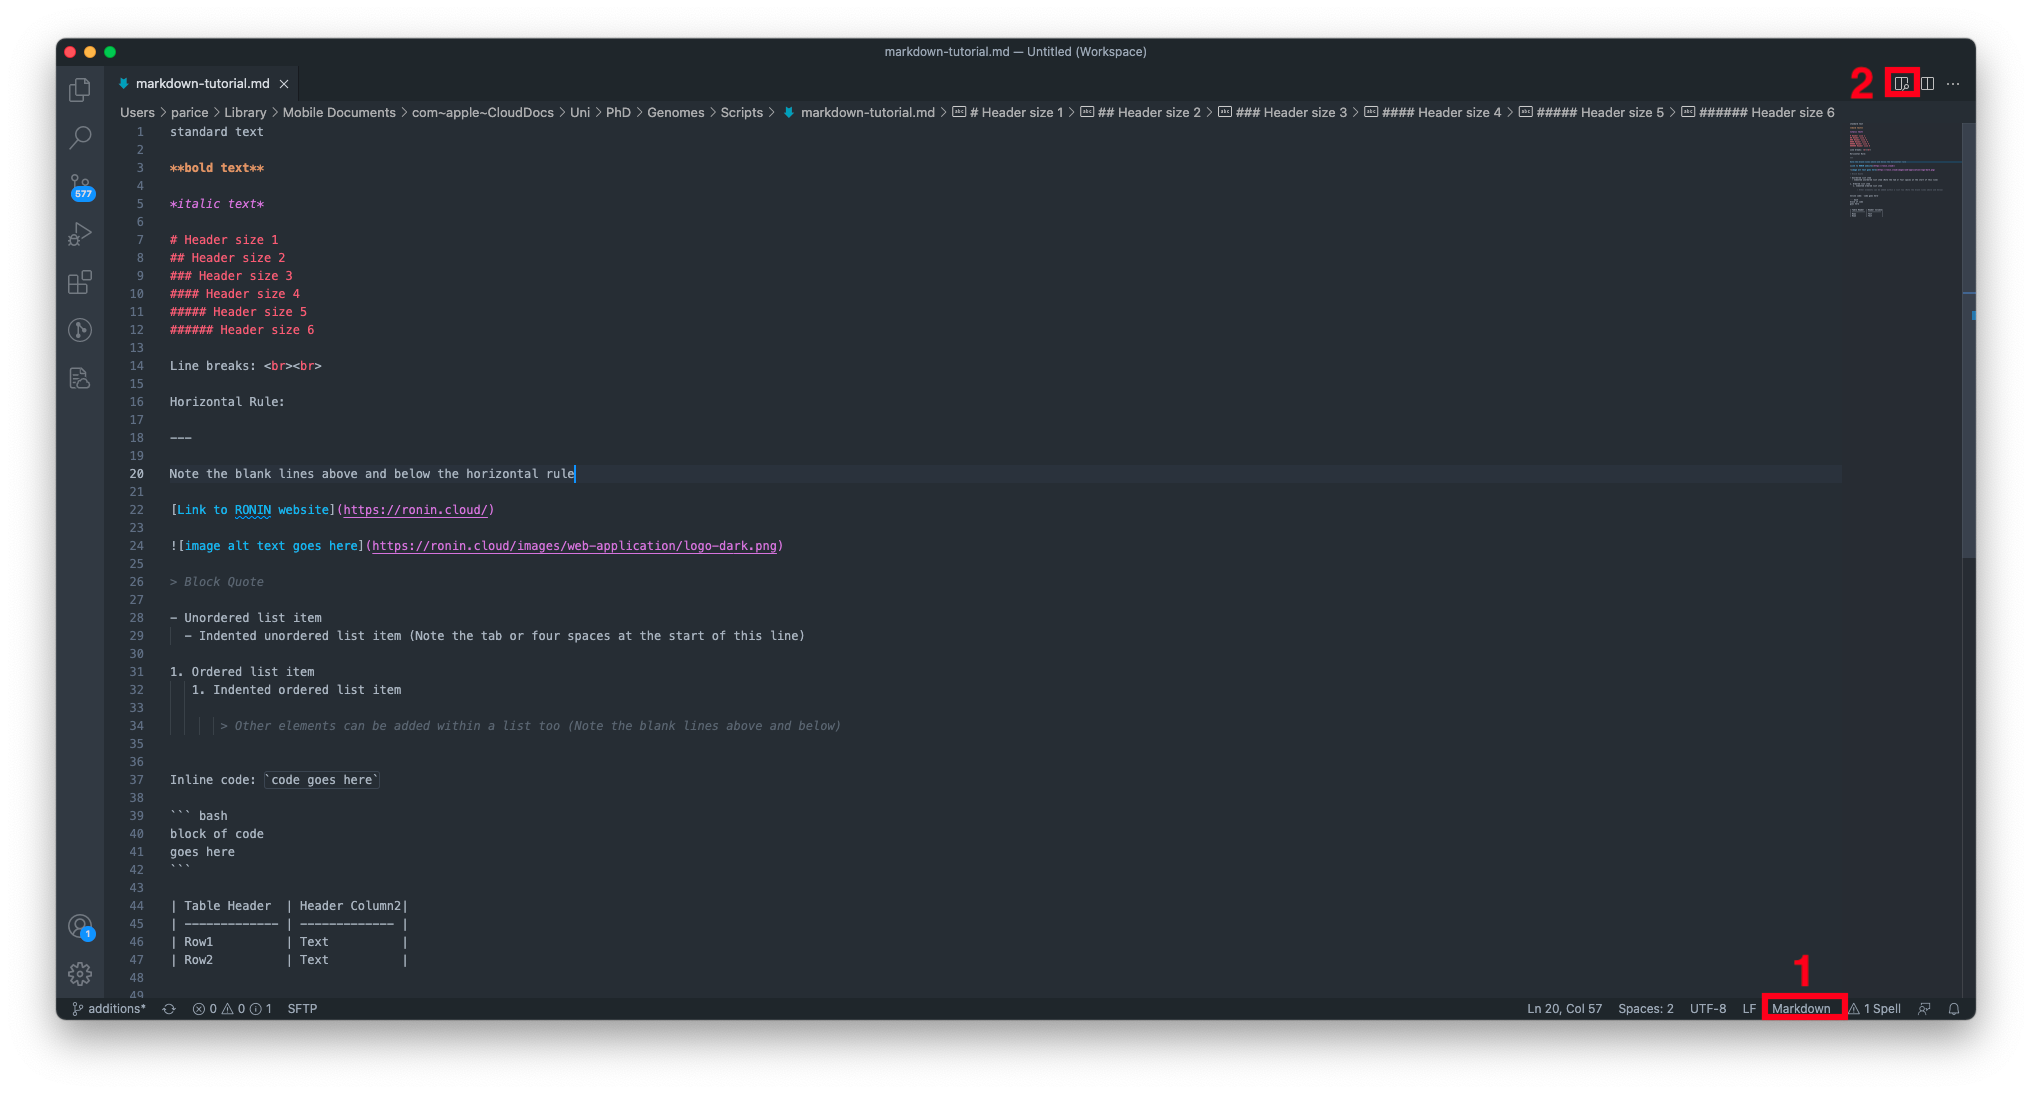
Alternatively, if you read our previous blog post and are already using Visual Studio Code to write and manage all of your code (we're so proud!), you will be happy to know that Visual Studio Code has built-in support for Markdown, including the ability to preview Markdown documents right within VS Code. To preview your Markdown documents, first, ensure that you have selected Markdown as the language for the document (see 1 in the screenshot below) and then select the preview button in the top right (see 2 in the screenshot below).
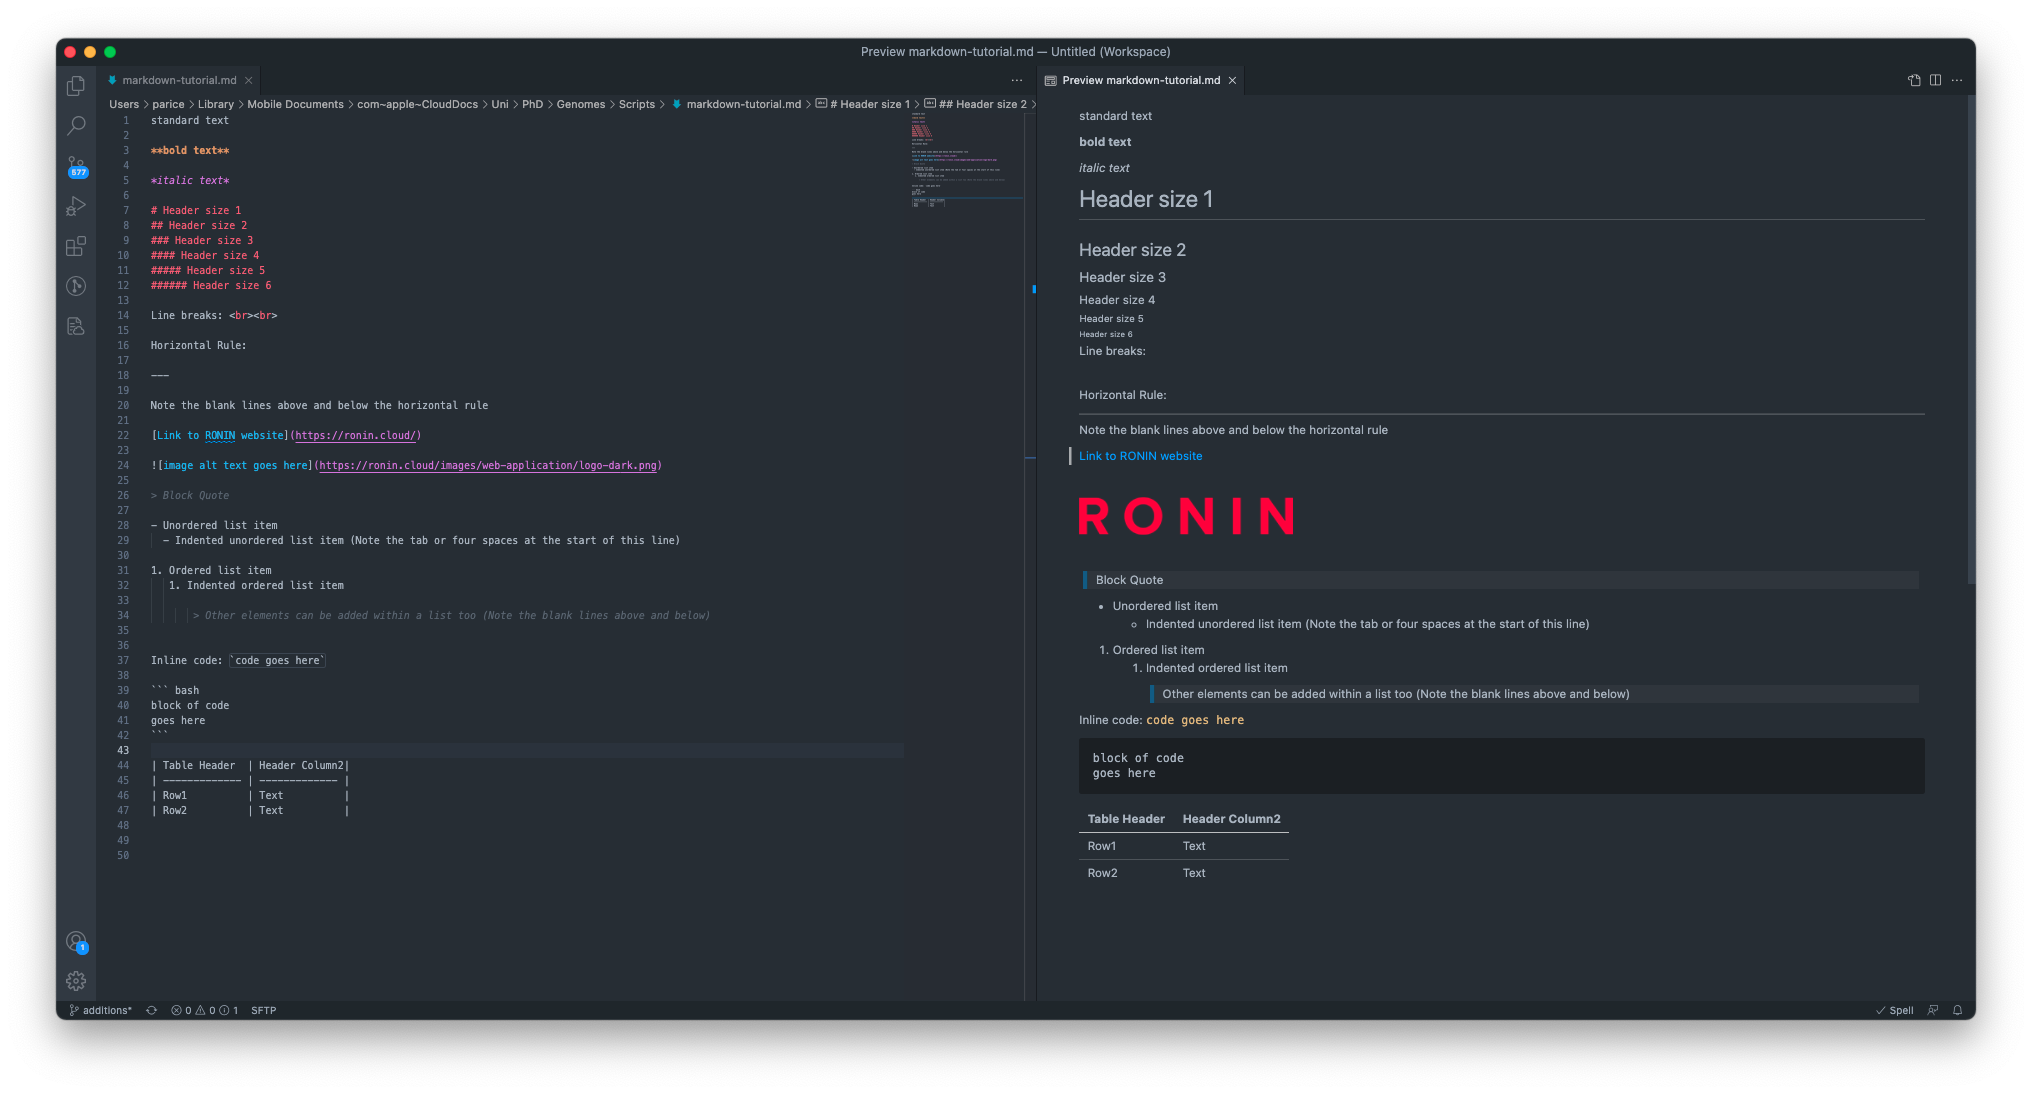
This will open a dynamic preview of your Markdown code on the right like so:
Now you can make sure your Markdown code is formatted exactly the way you like it before you upload it to Github or convert it to a pdf to share with others. Speaking of which, VS Code also has some great extensions for working with Markdown that we highly recommend.
- Markdown PDF allows you export your Markdown document as a beautiful PDF document (like the one at the top of this blog post), as well as options for exporting as HTML or as an image file
- Markdown All in One provides you with some quick keyboard shortcuts for Markdown syntax, formatting your Markdown code and even provides a simple way to add a Table of Contents to your documents
- markdownlint checks that your formatting is consistent and provides suggestions for any potential issues that should be resolved to ensure the greatest compatibility for all parsers
Is there a Markdown Cheat Sheet?
When you first start using Markdown it's handy to have a simple Cheat Sheet you can quickly refer to if you can't quite remember the exact syntax you need. Fortunately the Markdown Guide website has a great Cheat Sheet with links that go into more detail for both the basic and extended syntax. We definitely recommend either bookmarking or downloading the below Cheat Sheet until you are comfortable with all the syntax.

We promise it won't take long for you to be able to write Markdown documents in your sleep, and your future self (or perhaps your students, colleagues, or even users of your own software) will thank you for your beautifully documented workflows!