AWS Genomics Immersion Day RONIN Hands-On Workshop
Welcome to RONIN! Today we will be showing you around the RONIN platform and running you through a simple genomics workshop so that you can get some hands-on experience with all of the best features of RONIN.
We designed and built RONIN specifically for researchers like YOU! We want you to be able to get the most out of the cloud for your research, without having to waste precious research time learning how to become a cloud architect, or worrying about how much you are spending in the cloud.
If you would like to learn more about RONIN, please check out our website here: https://ronin.cloud/
Our blog site also has a bunch of useful tutorials and information, not just about RONIN and the cloud, but also helpful guides about Linux system administration and tools that may help make your life just that little bit easier: https://blog.ronin.cloud/
In this workshop you will be launching a virtual machine in RONIN, running a basic genome alignment and variant calling workflow on bacteria, then visualising the results with a virtual desktop, and monitoring your workload throughout. So let's get started!
1. Logging into RONIN
You should have received an email from RONIN with the link and details to login for the first time. You will need to reset your password on the first login and then you should see a screen which looks something like:
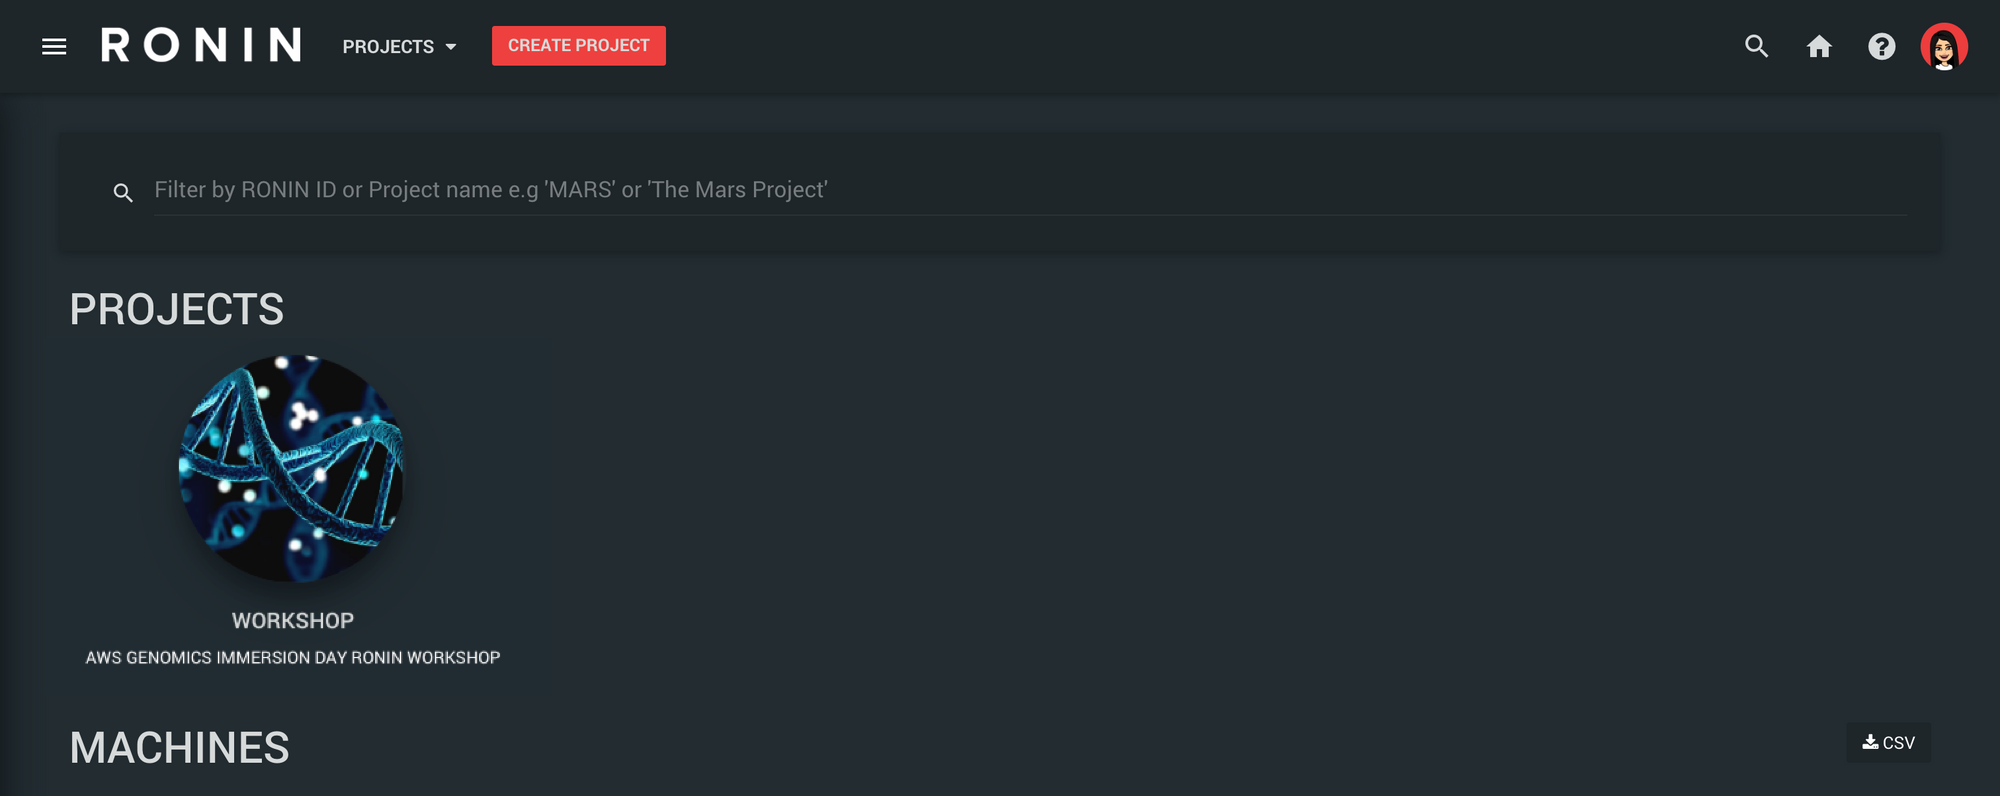
Click on the "workshop" project to begin!
Note: If you did not receive an email please check your junk/spam folder. If you aren't able to login or cannot see the workshop project, please let us know.
2. Create a new virtual machine in RONIN
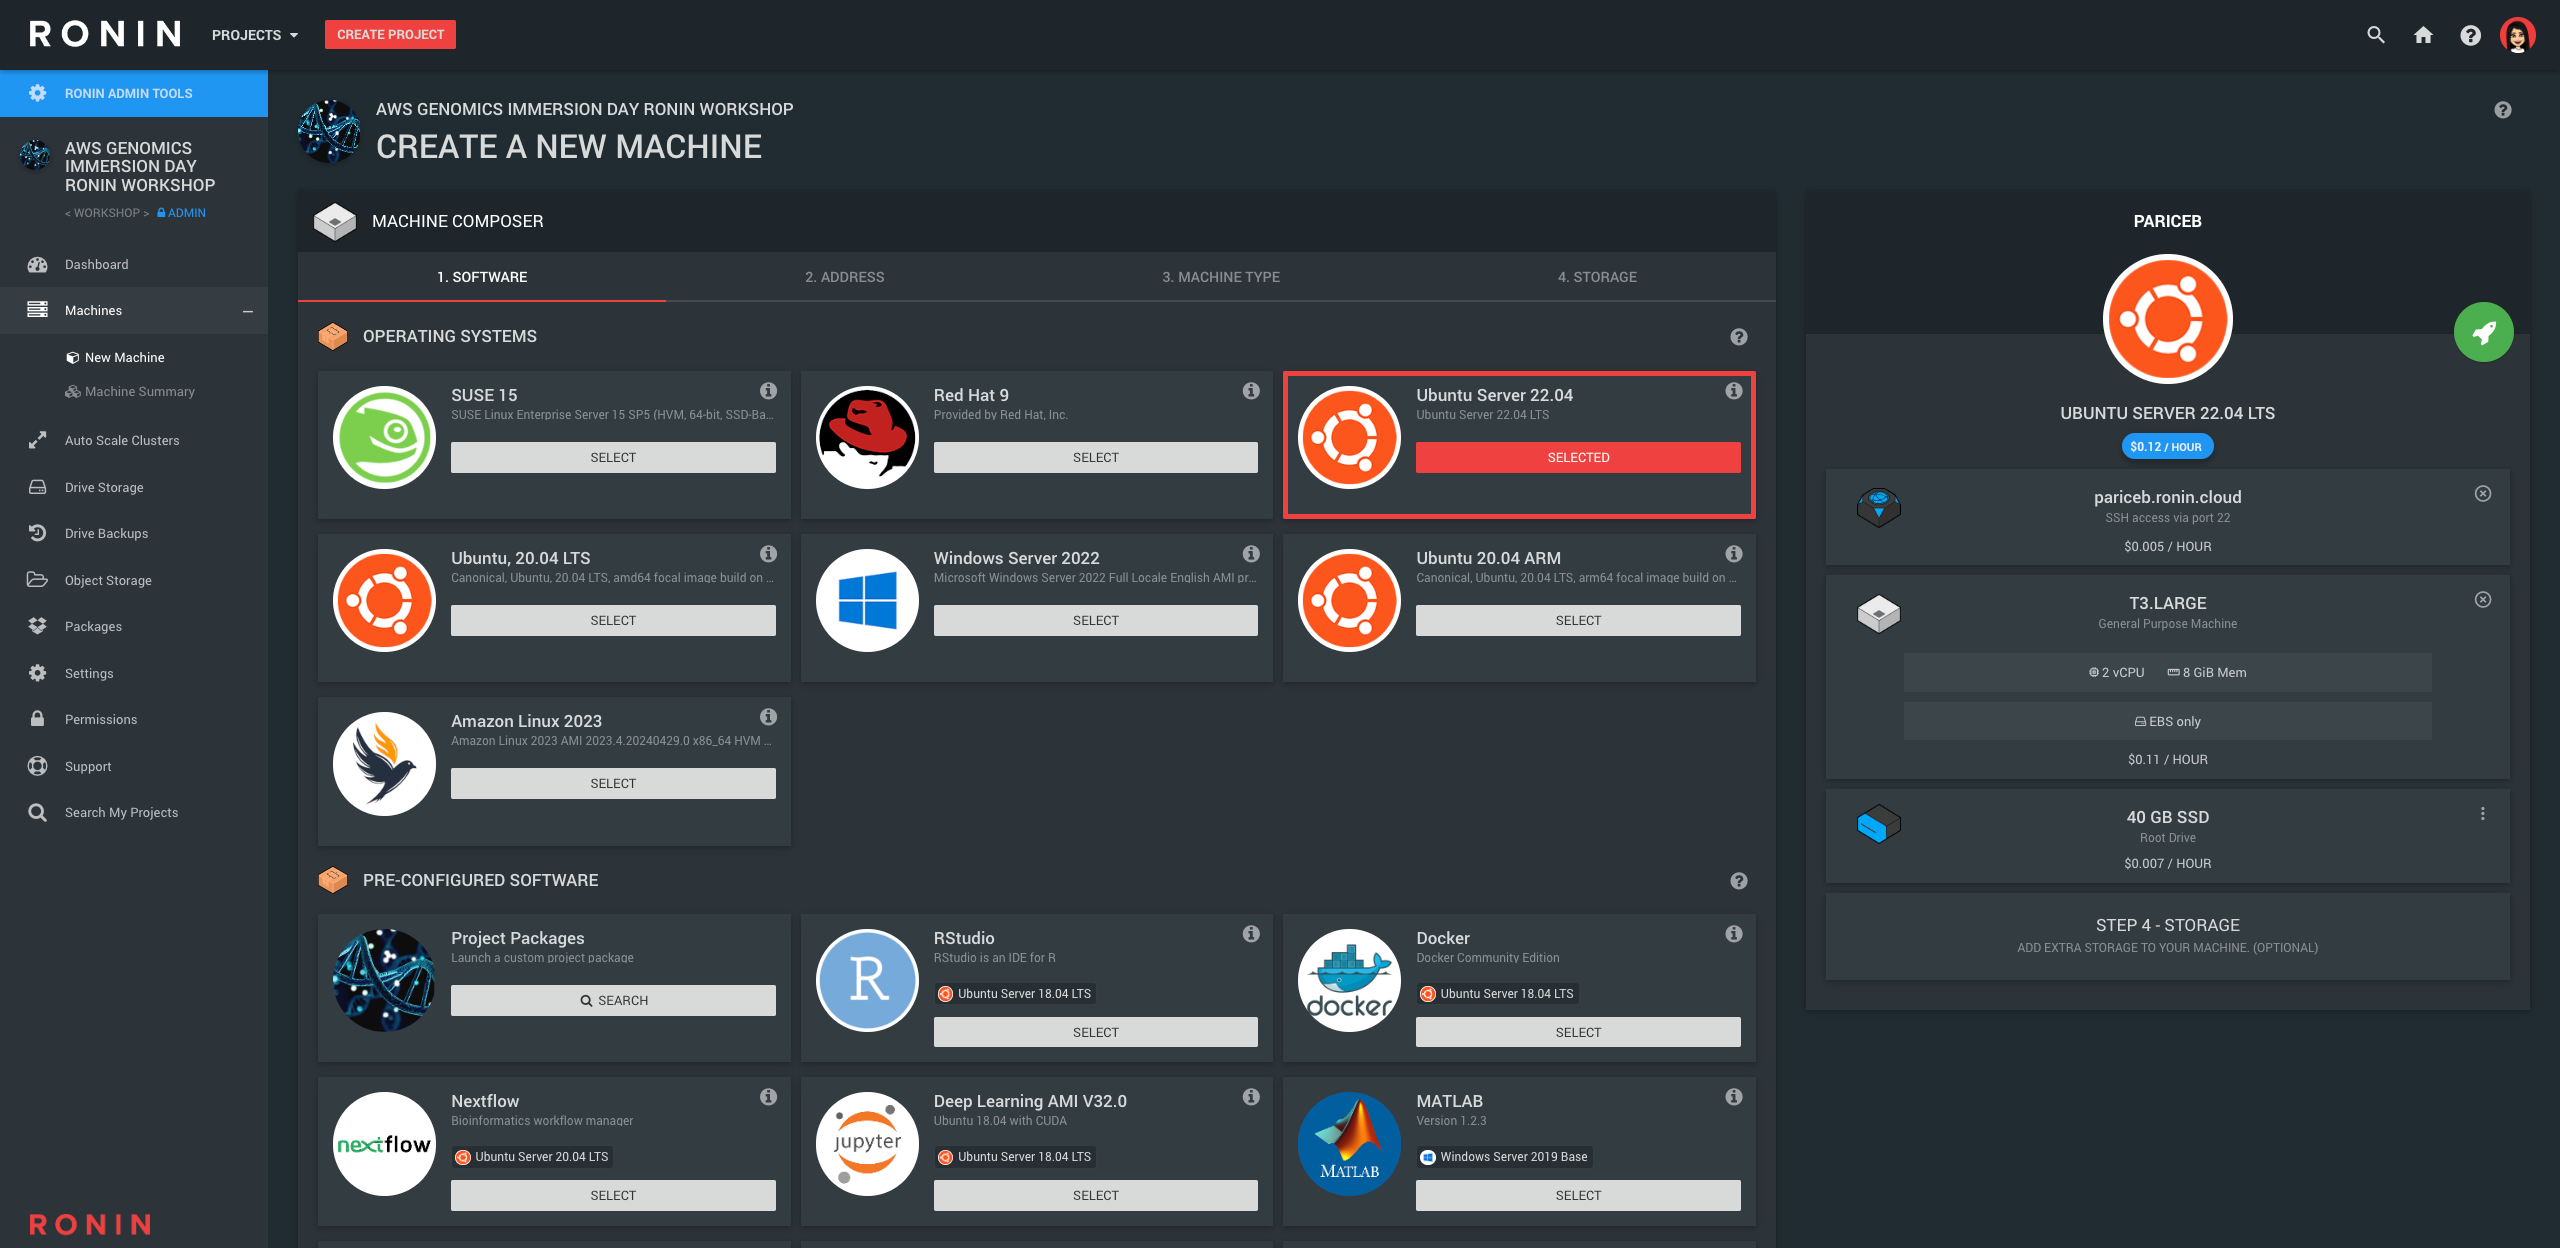
In RONIN, once you are in the Workshop project, navigate to the "New Machine" screen and create a machine with the following specs:
- OS: Ubuntu 22.04
- Address: YourName
- Machine Type: T3.Large - 2 vCPU, 8GB RAM (since we are working with small genomic datasets today, we don't need a very powerful machine)
- Storage: You do not need to add any additional drives here, instead make the root drive a bit bigger (40GB) using the 3 dots on the right hand side of this drive
- Key: After you hit the launch button, create a new SSH key file with your name, and then select it from the list. The new key should be downloaded to your default Downloads folder - we recommend leaving it here for the rest of the workshop.
If you need help with any of these steps, please refer to our tutorial for creating a new machine, here: https://blog.ronin.cloud/create-a-machine/
3. Install RONIN LINK
While your machine is being created and booting up, you will need to download and install our free desktop application called RONIN LINK:
 Aaron Albrighton
We will be using this to connect to our machine later on.
Note: If you do not wish to use RONIN LINK, most of this workshop can still be performed via standard SSH. RONIN LINK just provides lots of nice additional tools and options to help make your life easier!
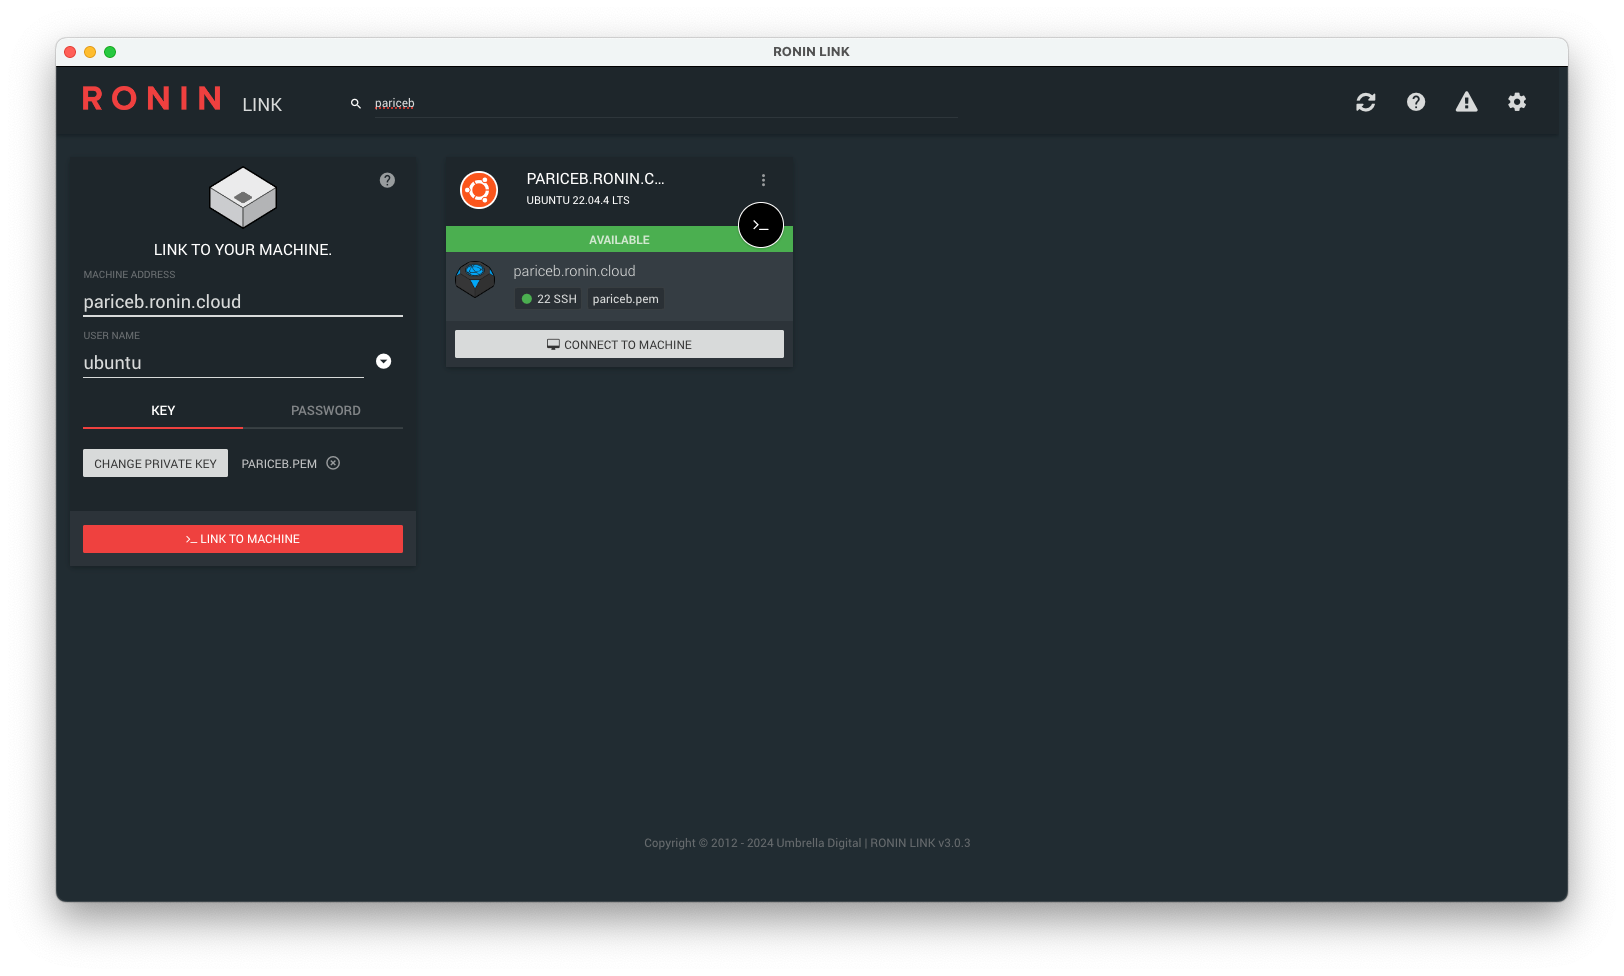
4. Connect to your machine with RONIN LINK
Navigate to the "Machine Summary" screen, find the machine you just created with your name and click the "Open in RONIN LINK" button.
Your machine card should be automatically added to RONIN LINK.
Note: If you receive a connection error message, please wait a few more minutes and try and connect again. If RONIN LINK cannot find your key, please click "Change private key" and select the key from the correct location.
5. Install Netdata
Before we start running our genomics workflow, we will install a monitoring agent called Netdata, which will allow us to track hundreds of metrics (e.g. CPU usage, RAM usage, storage usage etc) on our machine while our workflow is running.
To install Netdata, in RONIN LINK, click the "Connect to Machine" button on your machine card and then click the "LINK" button under Netdata. When prompted, allow RONIN LINK to install Netdata for you.
Once Netdata is installed, RONIN LINK will then take care of the port forwarding to allow you to securely connect to Netdata in your browser.
For more information about Netdata, see our blog post here: https://blog.ronin.cloud/netdata/
We will leave Netdata running in the background while we run our genomics workflow, you can come back to it at any time throughout the workshop to see how your machine metrics are looking!
6. Install all of the required software
One of the biggest perks of having your own virtual machine in the cloud is that you have complete Admin privileges of the machine. This means you can run whatever commands you would like to install and configure the environment exactly as you wish! No more submitting tickets to ask for a particular software or version to be installed.
The "Administrator" on Linux based machines (like our Ubuntu machine we just created) is known as the "root" user, and in order to run Administrator commands on the machine as the root user, you need to use the sudo command. You can learn more about this command here: https://blog.ronin.cloud/sudo/
One of the simplest ways to install common software, is using the Ubuntu package manager called "apt". This package manager allows you to easily install, update, remove and manage common software packages with simple commands. Apt takes care of installing and configuring any software dependencies and environmental variables for you. If you have used conda before, apt is similar except it uses the default Ubuntu user environment so that you don't need to worry about any virtual environments.
Note: Sometimes for more complicated workflows or environments, or where the software you wish to use is not available via Apt, an environment manager like conda may be necessary. See: https://blog.ronin.cloud/conda/
Only the root user can install software using apt, so you will need to use the fancy sudo command. For this workshop, we are going to be using some standard genomics tools including unzip, bwa, samtools and bcftools. These can all easily be installed with Apt in a single command as follows:
sudo apt install -y unzip bwa samtools bcftoolsConnect to your machine's terminal in RONIN LINK and run the above command to install the required software.
There is one other piece of software that we need which is not available with Apt, and this is the NCBI Datasets tool. To install this tool, all you need to do is download the binary file and make it executable as follows:
curl -o datasets 'https://ftp.ncbi.nlm.nih.gov/pub/datasets/command-line/v2/linux-amd64/datasets' && chmod +x datasetsNote: All of the workshop commands will take place in the default Home folder for the Ubuntu user at /home/ubuntu. This will ensure all files are kept together in the one place so that they are easier to keep track of. 7. Download the required files for the workshop
Today we are going to be working with example data for Mycobacterium tuberculosis. We will be mapping paired-end reads to the reference genome, performing variant calling on the mapped reads, and then visualising the results.
Let's start off by downloading the current reference genome (and the GFF3 annotation file which will come in handy later) for Mycobacterium tuberculosis using the NCBI datasets tool:
./datasets download genome accession GCF_000195835.3 --include gff3,genomeNow we need to unzip the downloaded folder, and move the genome and annotation files to our current folder for easier access:
unzip ncbi_dataset.zip && mv ncbi_dataset/data/GCF_000195835.3/* .Let's also download some example paired-end sequencing reads from the Sequence Read Archive for Mycobacterium tuberculosis:
wget ftp://ftp.sra.ebi.ac.uk/vol1/fastq/ERR495/ERR495003/ERR495003_1.fastq.gz && wget ftp://ftp.sra.ebi.ac.uk/vol1/fastq/ERR495/ERR495003/ERR495003_2.fastq.gzWe will unzip these reads to make things a bit easier:
gunzip ERR495003_1.fastq.gz ERR495003_2.fastq.gzIf you run the ls command to list what is in the current directory, you should be able to see the required input files (as well as some other NCBI datasets files that we no longer need to worry about):
- The reference genome:
GCF_000195835.3_ASM19583v2_genomic.fna - The reference genome annotation:
genomic.gff - The forward reads:
ERR495003_1.fastq - The reverse reads:
ERR495003_2.fastq
Note: We are just using a small dataset today, so we only need a relatively small machine that will run for a short period of time; however, the great thing about the cloud is that the almost unlimited computational and storage resources available means that you can perform genomic analyses at almost any scale and build your resources to fit your workflows. For example, if you were working on an organism with a much bigger genome and many more reads from many more samples, you could select a machine that has nearly 100 vCPUs and hundreds of GB of RAM. You could even launch your own Auto scaling cluster in RONIN and have each sample running on a different compute node to power through your entire analysis much quicker!
8. Run the genomic analysis workflow
Now that we have all of our input files, we will run through a standard genomic analysis workflow to align the reads to the reference genome and call variants.
First we need to index the reference genome with bwa index:
bwa index GCF_000195835.3_ASM19583v2_genomic.fnaThis will create a bunch of index files for your reference genome ending in .amb .ann .bwt .pac .sa
Next we will map the forward reads to the reference genome with bwa aln:
bwa aln GCF_000195835.3_ASM19583v2_genomic.fna ERR495003_1.fastq > ERR495003_1.saiAnd similarly, map the reverse reads to the reference genome:
bwa aln GCF_000195835.3_ASM19583v2_genomic.fna ERR495003_2.fastq > ERR495003_2.saiWe will then use our two mapping files (ending in .sai) to create the paired-end alignment of our reads to the reference genome to create a Sequence Alignment Map .sam file with bwa sampe:
bwa sampe GCF_000195835.3_ASM19583v2_genomic.fna ERR495003_1.sai ERR495003_2.sai ERR495003_1.fastq ERR495003_2.fastq >ERR495003-pe.samWe should now use samtools to convert our human-readable .sam file to a more computer-friendly .bam file which is often used in downsteam applications:
samtools view -S -b ERR495003-pe.sam > ERR495003-pe.bamOur .bam file now needs to be sorted correctly, we can also do that with samtools:
samtools sort ERR495003-pe.bam > ERR495003-pe-sorted.bamNow we have our final alignment, we should call variants in the reads against the reference genome with bcftools. This will show us where the sample (that the reads came from) is different genetically to the reference genome:
bcftools mpileup -f GCF_000195835.3_ASM19583v2_genomic.fna ERR495003-pe-sorted.bam | bcftools call -mv -Ov -o ERR495003.vcfThe final step is to index our sorted .bam file so that we can visualise the results in the next steps:
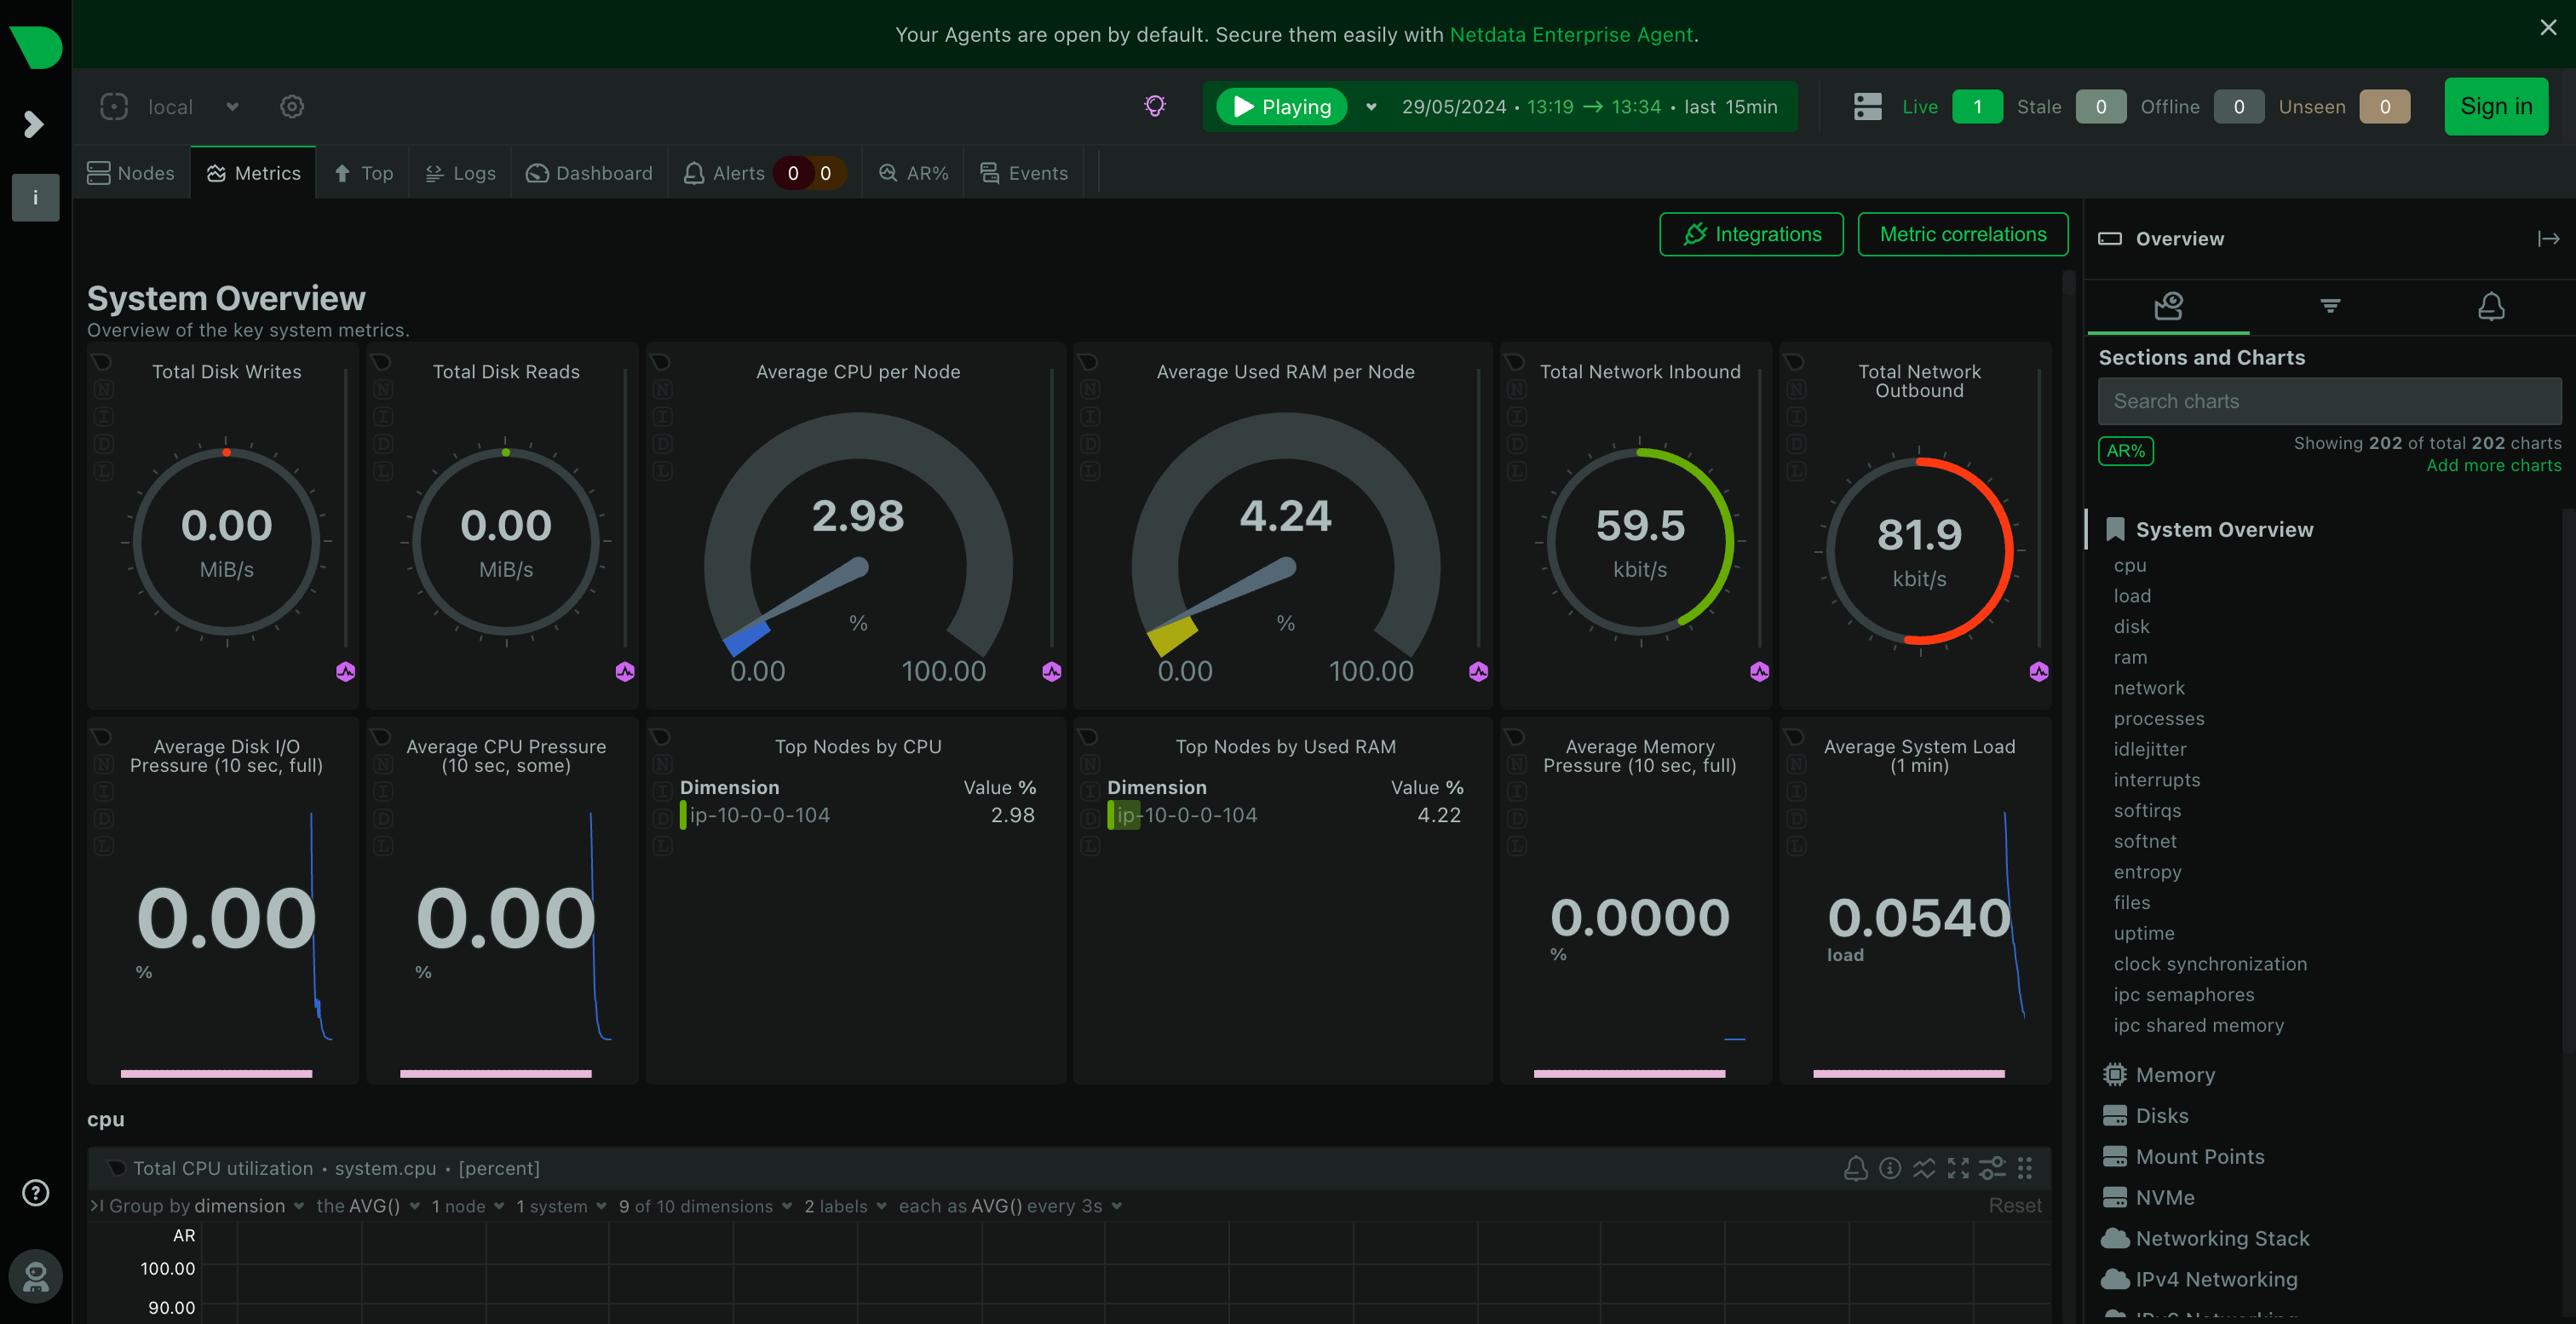
samtools index ERR495003-pe-sorted.bamYou should take a look back at your Netdata dashboard now and you should notice some peaks in CPU usage and RAM usage as you were running some of these steps like so:
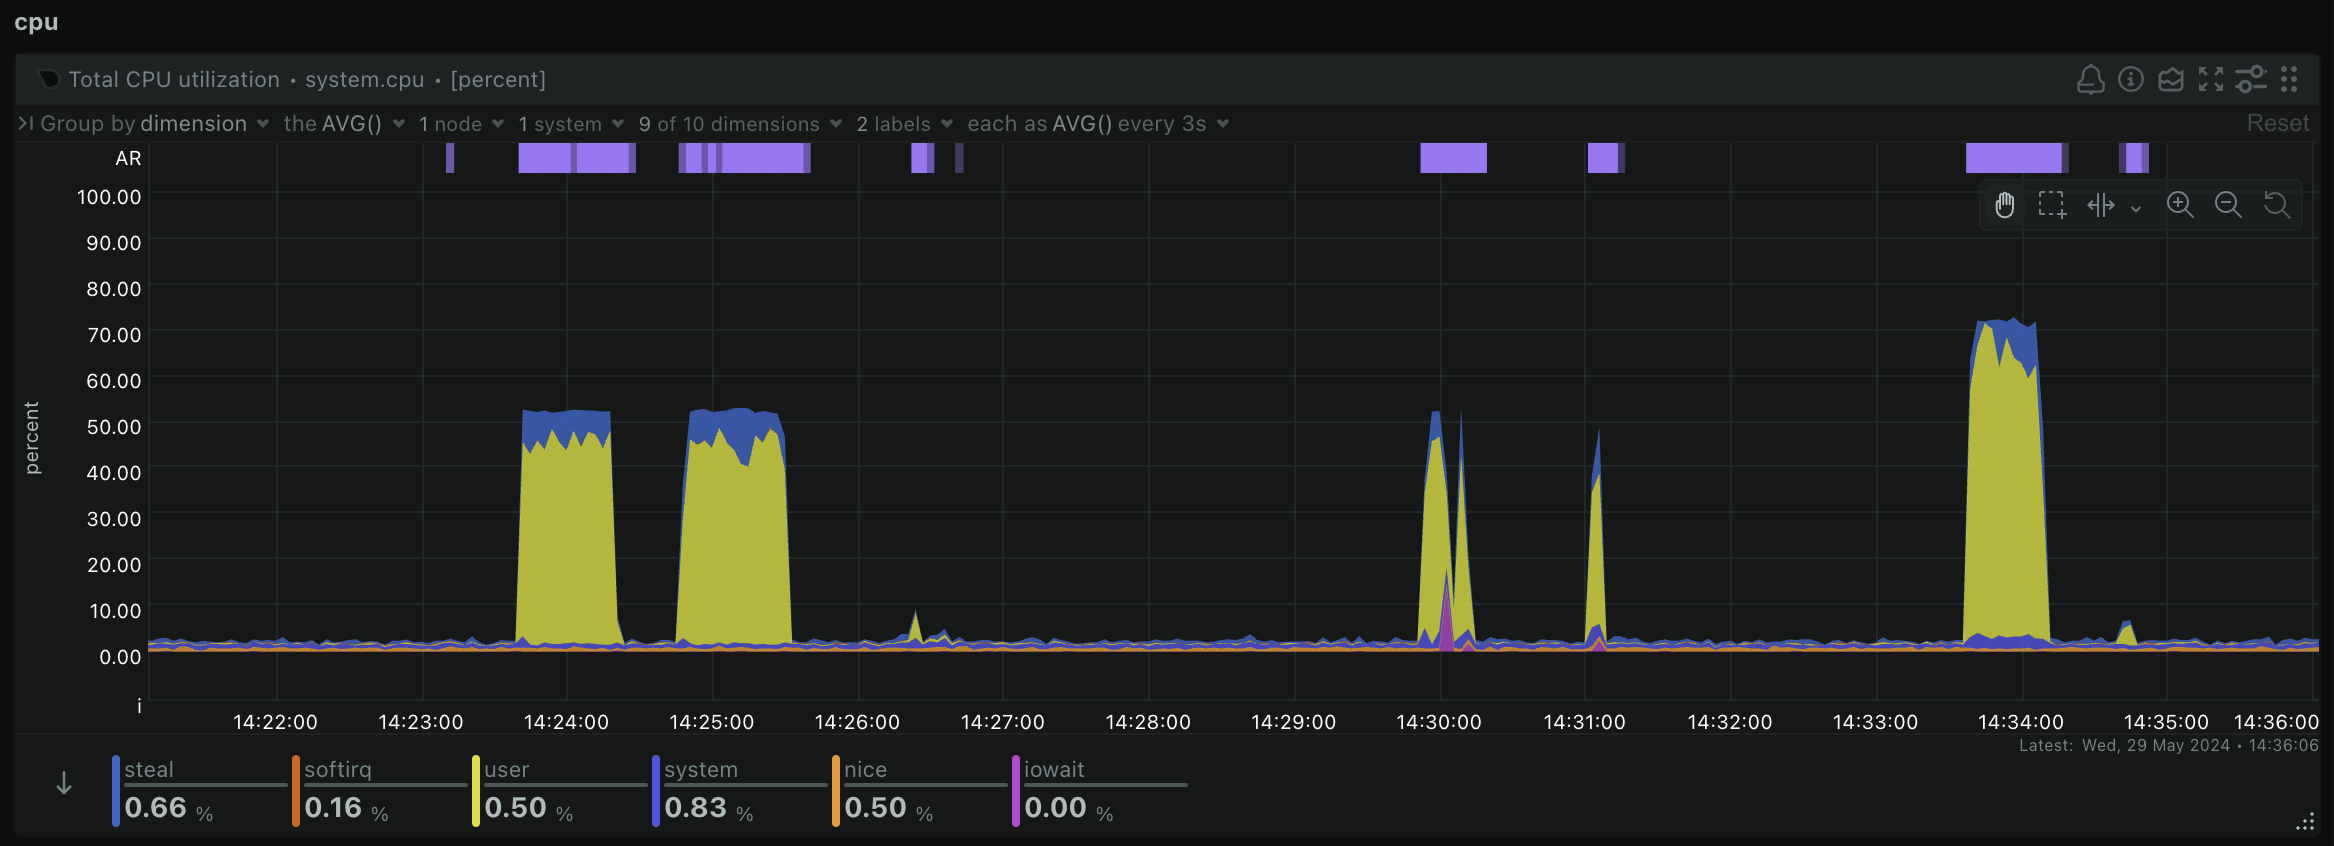
This is a great way to be able to tell whether your workflow is actually using all of the computing resources you have given it. If you notice you aren't using all of the available CPU and RAM, you might choose a smaller machine to save costs. Or if your workflow unexpectedly crashes, you might notice that you have run out of memory or storage, so need to increase the size of your machine or storage drives and try again.
We always recommend starting with a single sample on an analysis you may have never run before to get an estimation of the compute resources you may require, so that you can choose the most suitable machine type and storage size for your workflow. This is the best way to optimise your costs in the cloud and get the most out of your project budget!
9. Visualising your results
Today we are going to show you two different ways to visualise your results. The first is in the command line using samtools tview and the second is by launching a virtual desktop on your RONIN machine with RONIN LINK.
To visualise your results in the command line, simply run the following command:
samtools tview ERR495003-pe-sorted.bam GCF_000195835.3_ASM19583v2_genomic.fnaThis will bring up a visual of your reads mapped to your reference genome and any variants in that alignment. You can press ? to get more information on how to use this view and some of the options you can configure. Some of the basics are: . is match on forward strand , is match on negative strand and letters represent variation. You can press q to exit this view when you are finished.

This view is great for some pretty basic visualisation, but to really understand your results properly and see whether there are any variants in important genes, we probably need something a bit more advanced.
The Integrative Genomics Viewer (IGV) is a tool that has been around for many years and offers a free, simple GUI for analysis common genomic files, including many of the files we created in this workshop today. Often, you would need to download or transfer your results file to your own personal computer to be able to visualise them; however, using RONIN LINK, you can easily launch a virtual desktop right on your virtual machine, so you can visualise your results on the same machine you used to create them - neat, right!
To launch a virtual desktop on your RONIN machine, in RONIN LINK, click the "Connect to Machine" button and then click the "Desktop" button. When prompted, allow RONIN LINK to install and configure DCV on your machine for you, which is Amazon's desktop virtualisation software.
The installation will take a few minutes, but once it is complete, RONIN LINK will launch the virtual desktop for you. This desktop may look a little unfamiliar, but that's because it is a Linux desktop and not your typical Mac/Windows desktop, though it should still feel relatively similar to use. For example, you can click on the little filing cabinet on the bottom toolbar and this will show you all of your files that we have created throughout this workshop (along with some other standard desktop folders too).
Note: You may want to click the fullscreen icon to scale the desktop properly on your screen.
To download and launch IGV on the desktop we are going to be using the terminal inside the desktop, as this is often the quickest and smoothest way on Linux. To do so, click on the show applications icon in the bottom toolbar to see all of your apps, and then click on the "Terminal" app. This is similar to running commands in the terminal like we did earlier, but since this terminal is within the virtual Desktop it will allow us to launch desktop apps.
In the terminal run the following command to download and unzip IGV:
wget https://data.broadinstitute.org/igv/projects/downloads/2.17/IGV_Linux_2.17.4_WithJava.zip && unzip IGV_Linux_2.17.4_WithJava.zipNote: You should be able to use right-click to paste your commands in the Desktop terminal window.
You can then run the following command to launch IGV:
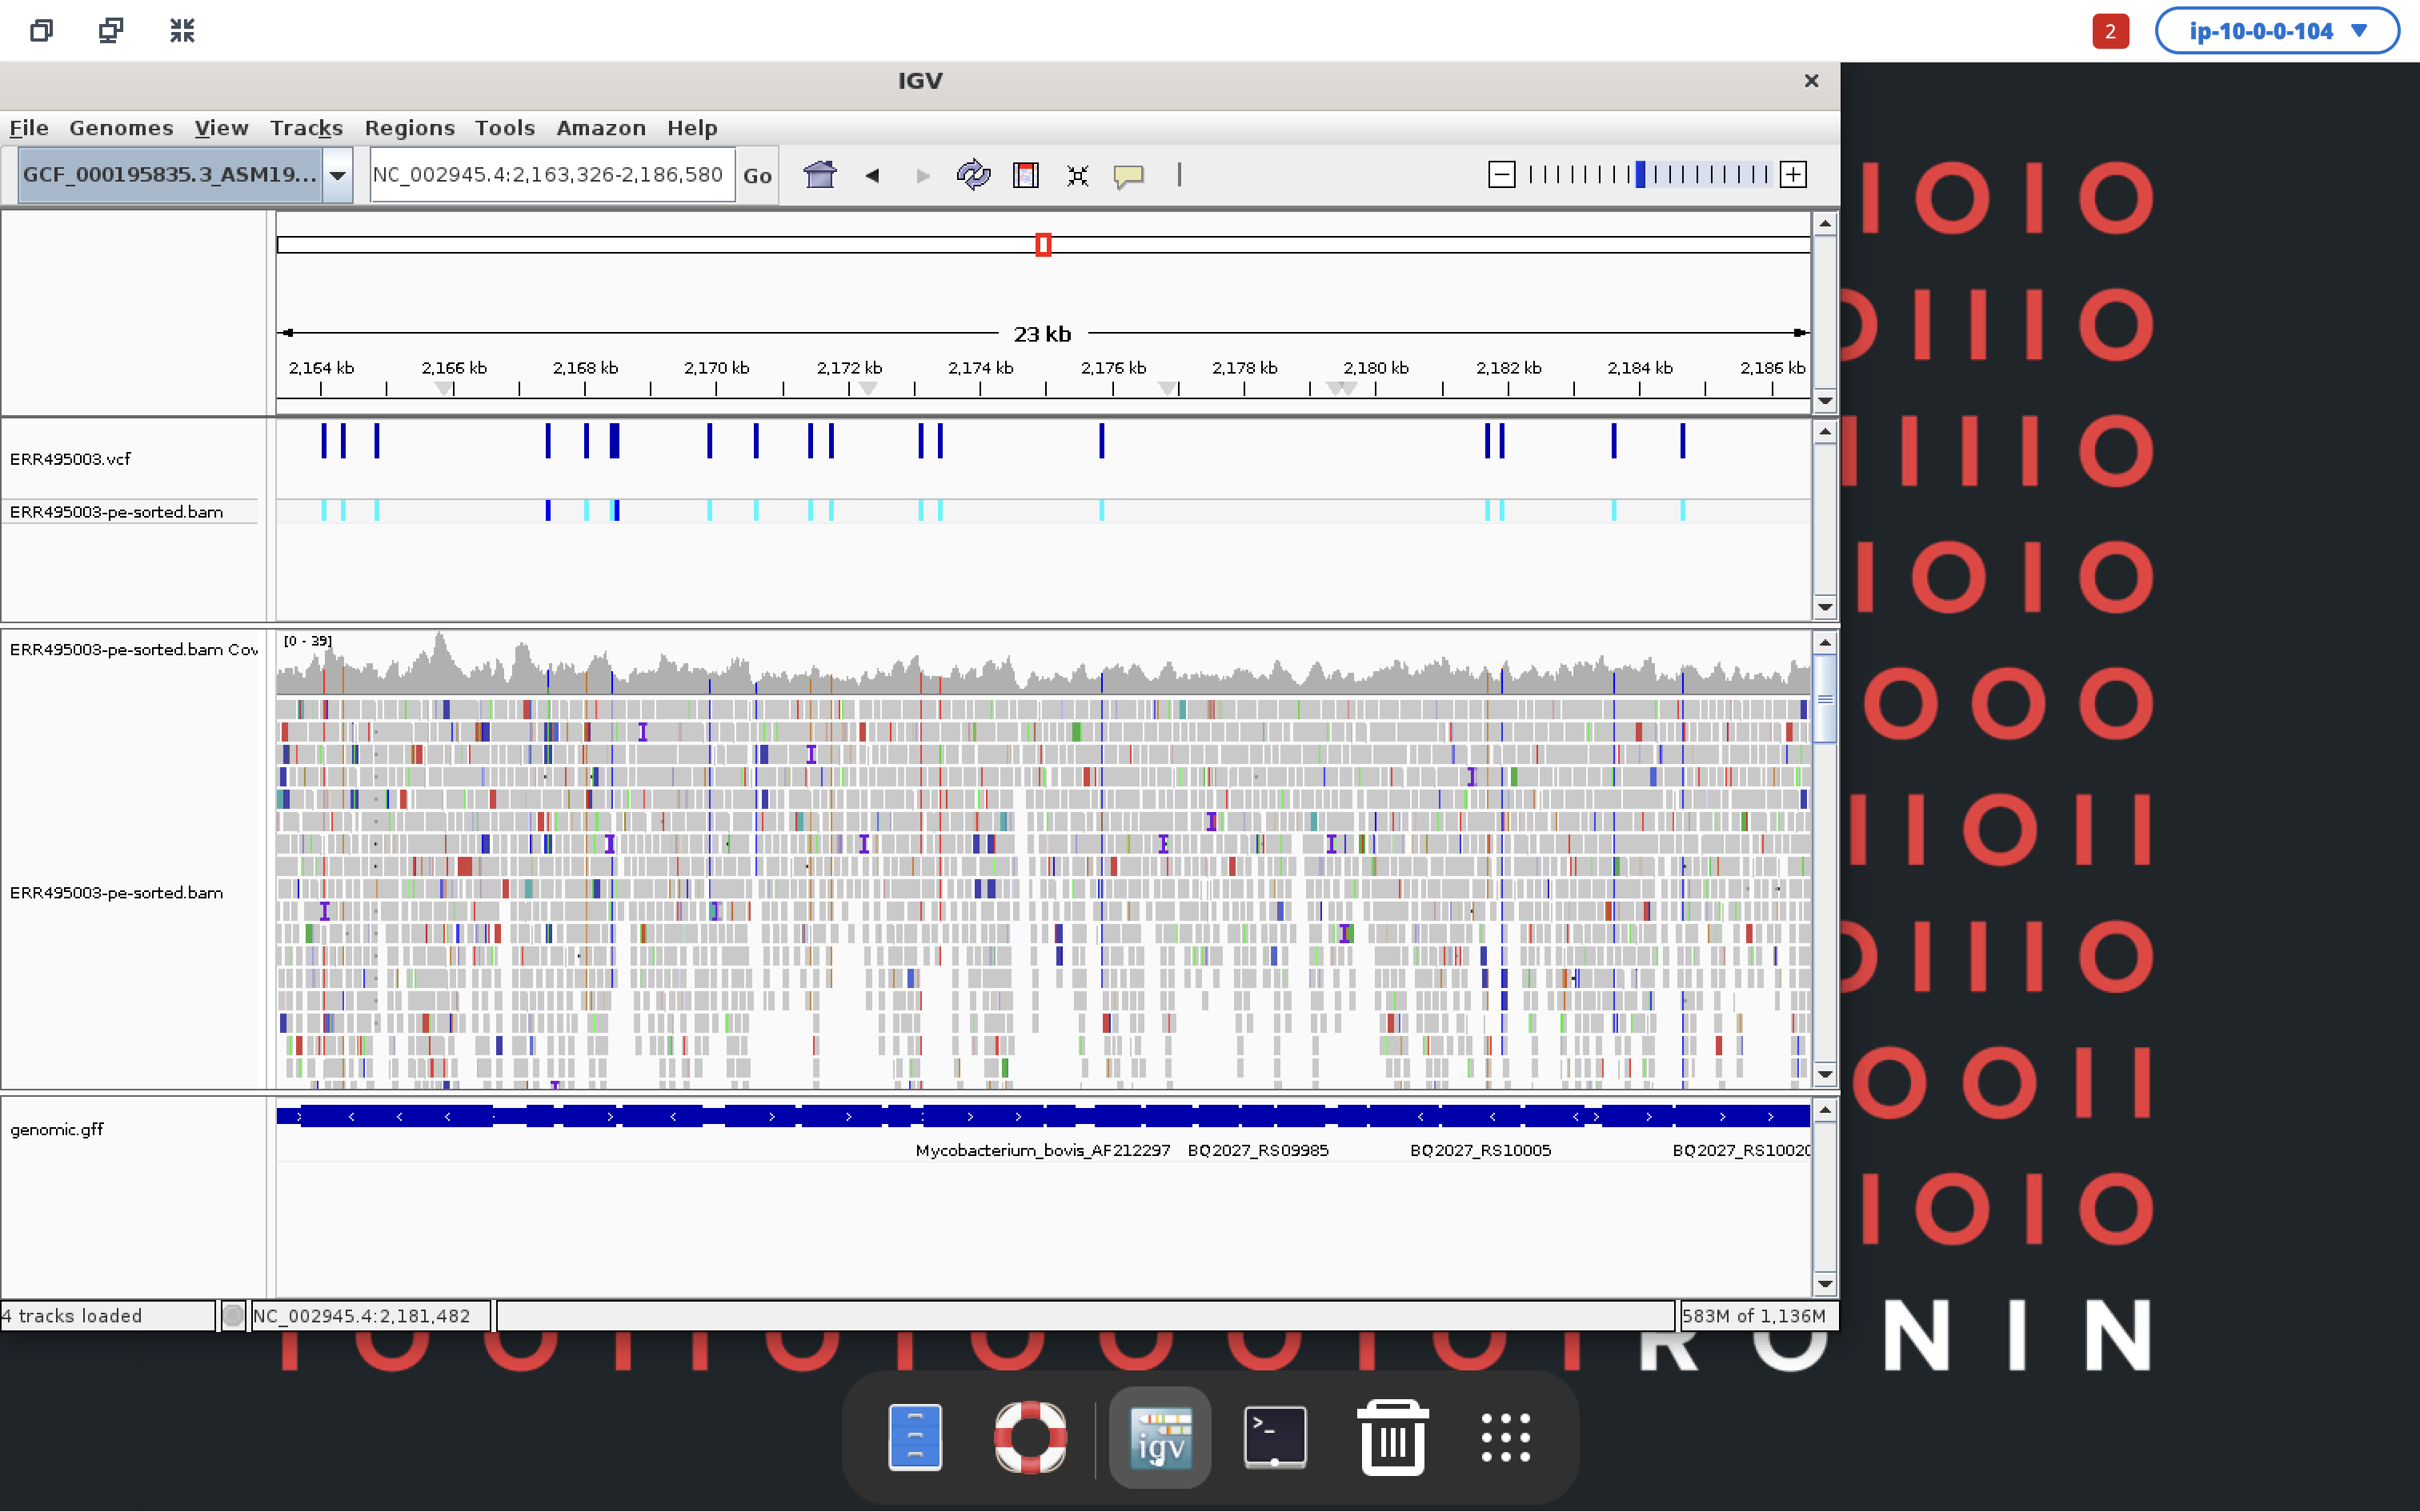
bash IGV_Linux_2.17.4/igv.shOnce IGV is up and running we will load all of our results files in so that we can visualise them all together:
- Open the reference genome: Genomes > Load Genome from File > Select GCF_000195835.3_ASM19583v2_genomic.fna > Open
- Open the annotation file: File > Load from File > genomic.gff > Open
- Open the sorted alignment bam file: File > Load from File > ERR495003-pe-sorted.bam > Open
- Open the VCF file: File > Load from File > ERR495003.vcf > Open
Your Mycobacterium tuberculosis reference genome will be up the top, followed by your VCF file, bam alignments and then gff annotation file at the bottom. You can click anywhere in the top rectangle to move along the reference genome and zoom in using the slider in the top right to get a better view of the data and what genes your variants are sitting in. Pretty awesome, right!
We hope you have enjoyed this workshop and have had a small taste of what is possible when leveraging the cloud for your genomics research with RONIN!

If you have any questions or would like to learn more, please feel free to join our Slack community where you will have access many RONIN researchers around the globe and the entire RONIN team! :)
Don Hancock