Everything You Never Needed to Know About Drives, File Systems and Storage
When you build a computer, it needs storage. When you build a computer on the cloud, you try to get by with the smallest disk drives (or volumes) you can to fit the software and data that you have, so that you can avoid paying for disk space you don't need.

When you build a computer, it needs storage. When you build a computer on the cloud, you try to get by with the smallest disk drives (or volumes) you can to fit the software and data that you have, so that you can avoid paying for disk space you don't need. However, the positive side of this optimization game is that you can change the size of your drive in a few clicks when you run out of space. No tiny screwdrivers required! But you do need to know some things.
Here, we cover some basics about drives, partitions, file systems and mount points that are important to managing storage in RONIN, but that you probably never needed to know unless you also moonlighted as your lab's system administrator. We focus here on Linux, but the concepts also apply to Windows.
Disk Drives
You are probably familiar with a disk drive, called a storage drive in RONIN. Data that you store on a drive stays there, like on a physical hard drive. You can use a drive to hold a database, your operating system (root) data, or file data, because you can access individual blocks of data on a drive. This is called "block storage". You will typically copy data from object storage to block storage so that you can work with it more flexibly on your machine.
Because these drives exist in the cloud, you can attach them to machines and detach them to machines virtually, as opposed to opening up the computer case to swap hardware. However, this process is a bit more complicated than plugging in flash drives. Read on if you dare!

Partitions
In RONIN you will usually have drives that hold everything related to the computer (the operating system, your home directory, and all the temporary and log files - known as the "root" drive) and additional attached drives that you set aside for applications and data files that you wish to move around between computers.
Drives can be split up into one or more logical partitions. The simplest configuration is to just have one partition per drive, or no partitions at all. For example, the root drive of machines and clusters created in RONIN will always be created with one partition that is the full size of the root drive, whereas other attached storage drives that are mounted when you first create a machine or cluster won't have a partition at all. The advantage to creating multiple partitions per drive is that if one partition fills up, it will not affect the others. In practice though, because we can choose drives to be the size that we need, in RONIN you generally won't need to worry about creating partitions.
To see all of the drives that are currently attached to your machine or cluster, and determine whether they are partitioned or not, you can run the command:
lsblkThe output from this command will also show which drives/partitions are mounted and their respective mount point (see Mount Points section below), as well as the size of those drives.
If you have a drive that has not yet been mounted and you want to learn how to mount and use it click here.
File Systems
Drives must have file systems on them for you to be able to mount and use them. You can create a file system on a drive directly, or if your drive is partitioned, you can create a file system on a partition. It is important to note that if you create a new file system on top of an existing file system, it will overwrite your data, so it is always best to check whether one exists first. For example, new blank drives that are created and attached to existing machines in RONIN will not have a filesystem, but backups that have been restored to a drive in RONIN will have a partition and a filesystem on that partition.
There are also different types of file systems available such as ext4, ZFS, XFS, Btrfs, Reiser4 etc. The ext4 file system is the default for Ubuntu, while XFS is the default for RedHat. To check if a drive has a file system and what type of file system it has, run the command:
df -hTThis command will also let you see how big the file systems are and how much you have used.
If the size you get from the
df -hT command for a particular drive is different from the lsblk commmand, it is likely that your drive has been resized but the file system has not been extended to reflect the new size. See the section below on increasing the size of a drive to see how to extend your filesystem.
Mount Points
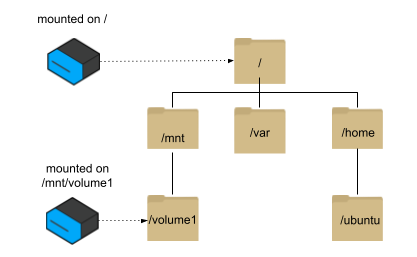
File systems are attached to the Linux directory tree at special directories called mount points. Figure 1 shows a machine with two drives. Each drive has a single file system. One drive is mounted on /, and all the directories and files beneath it are located on that drive — except that the second drive is mounted on /mnt/volume1. Once a user changes directory to /mnt/volume1, they are now writing to the second drive. By default, when you create a new storage drive when creating a machine, it will be mounted in /mnt. Storage for application files and input/output data on a cluster will be mounted on /apps and /shared respectively.

File systems can be mounted at any directory in the tree, which can be confusing if you accidentally mount a file system on top of existing data, or if you unmount it and wonder where everything has gone.
You can permanently configure where a drive attached to a machine should be mounted by editing the file /etc/fstab.
Resizing Drives
Inevitably, you create a drive, begin doing your work, and realize that you have run out of space. This may be on your root drive, or it may be on one of your other attached and mounted drives.
In RONIN you can make a drive bigger by either resizing it, or making a snapshot of your drive, restoring it as a larger size drive, and then attaching it to your machine. However, after you do that you will need to carefully let the operating system know what you have done so that you can use the additional storage space. We don't do this for you because we know you would hate us if we accidentally deleted any of your data, but below we will show you the steps you need to follow depending on the current state of your drive (refer to the sections above to determine whether your resized drive has been partitioned and what type of file system it has).
You will need to follow the steps here to extend your filesystem.
If your drive does not have a partition
If you have resized an attached storage drive that has not been partitioned, the good news is that it is super easy to extend the filesystem on that drive!
If your drive has an ext4 file system, just grab the drive name from the df -hT command (in this example we will assume the name is /dev/nvme1n1 - replace this as needed) and run the following command:
sudo resize2fs /dev/nvme1n1
If your drive has an XFS file system, just grab the mount point from the df -hT command (in this example we will assume the mount point is /mnt/volume1 - replace this as needed) and run the following command:
sudo xfs_growfs -d /mnt/volume1If the XFS tools are not already installed, you can install them with
sudo yum install xfsprogs.
If your drive has a partition
Suppose you make a snapshot of your 10GB drive attached on /mnt/volume1, restore it to a 25GB larger drive, and reattach that new drive to your machine. The command lsblk (Figure 2) shows that it is indeed 25GB, but it has a 10GB partition mounted on /mnt/volume1. Your data are all there, but you cannot yet use the space on the larger drive. This also occurs when you resize a root drive, or any drive with a partition.

We know from the command df -T above that this is an ext4 file system, and the commands we use below assume this to illustrate the basic concepts. For the black belt rundown and for other file system types, see the AWS documentation.
First we need to resize the partition to be the size of the drive. We can do this with the command growpart, which must be run as superuser. The first argument is the drive (volume) name, which has the type 'disk' in Figure 2. The second argument is the partition number, which we know from the p1 at the end of the partition name beneath the disk name is 1.
sudo growpart /dev/nvme0n1 1
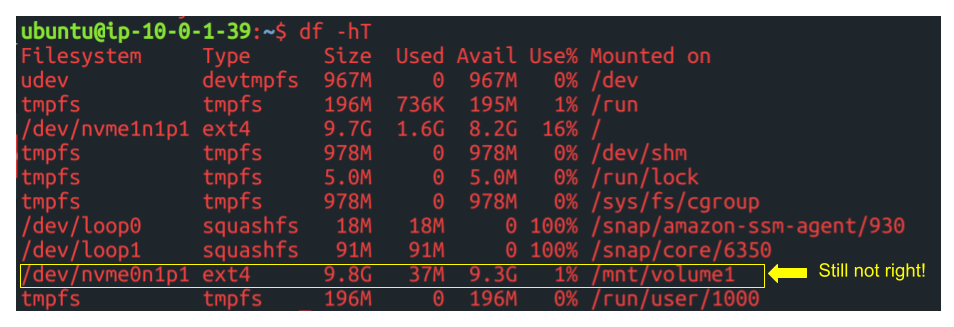
Now lsblk looks more accurate, but if we do a df, we still see the 10GB file system haunting us! (Figure 3)

The problem is that we need to extend the file system to fill up the resized partition. We can do this with the command resize2fs:
sudo resize2fs /dev/nvme0n1p1
Now you can use the entire, larger drive. Verify with the command df -H.
To Summarize...
Storage drives can be divided into partitions and require a file systems to be able to mount and use them. You mount a file system to access it by extending the directory tree to the files that are located there. When you resize a drive you need to extend the file system, which requires some Linux system administration skills but is not impossible. And with these skills, you can go out and make a drive big enough to store just about anything!

